-this page keeps glitching and deleting text (more so than on other articles), I think maybe we should split it into four/five articles (I know), prepping calibrations (including customising calibration cycle), position calibration, uniformity calibration, colour calibration, and finally result extraction. I think it's just way too long as is. The other option is we just cut down on the screenshots a lot.
- there are face emojis in this one, and not really in the others, delete these ones? // need to update some interface images, and some bits which are missing noted in-text below // sections also need shorted titles in the intro, a bit more concise overall on titling //
Before you can perform your first tests, you'll need to locally calibrate your Delvotest® Accelerator Smart (DAS). Calibration ensures your systems deliver accurate and reliable results by adjusting its internal parameters to match expected standards. In this article, we’ll cover:
- What you’ll need to perform calibrations
- Step-by-step guide to execute your first:
- Position calibration
- Uniformity calibration
- and Colour calibration
- How you extract your calibration's results
- How to manage your customisable calibration cycles
What you'll need
Like all calibrations, reference standards are essential to serve as external baselines, providing accurate points of comparison for measuring and adjusting a system's accuracy. This is also the case for the DAS, for which there are two 'reference standard packages' you can follow: the 'old' and the 'new' packages.
Reference Standards Package 1 (The 'Old Way')
Pre-2025, the three DAS calibrations (position, uniformity, colour) required individual reference standards for each. This means under this system you'll need to have three things ready:
White Paper (Uniformity)
For uniformity calibrations under this 'old' reference standards package, you'll need a normal (i.e. standard printer paper, 90 gram/m2) piece of white paper, cut-to-size (155 x 130 mm). It should have a 'matte finish' with a whiteness index of 95 < CIE < 170 — just like this:

Black Paper (Position)
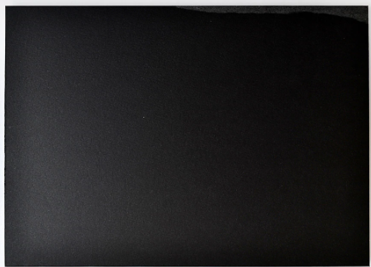
For position calibrations under this 'old' reference standards package, you'll need a normal (90 gram/m2), cut-to-size (190 x 240 mm) black piece of paper. It should have a 'matte finish' — just like in the example below. Dark, so-called 'copier paper' (i.e., black print created by 'scanning' a standard piece of printer paper whilst the scanner's lid is open) or a black cloth fitting to the required dimensions (i.e., 190 x 240 mm) should be enough.
Un-Incubated Delvotest® Plate (Position)
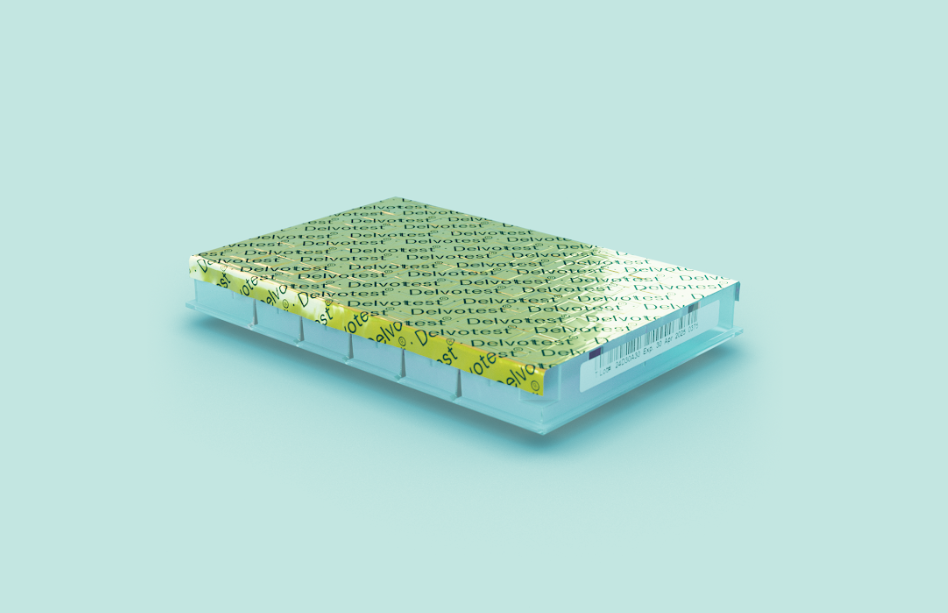
You'll also need a fresh, un-incubated Delvotest® plate (either Delvotest® T or Delvotest® SP NT). Keep the foil on, and set it aside together with your cut-to-size black paper — you'll need both to execute a 'position' calibration.
Colourcard (Colour)
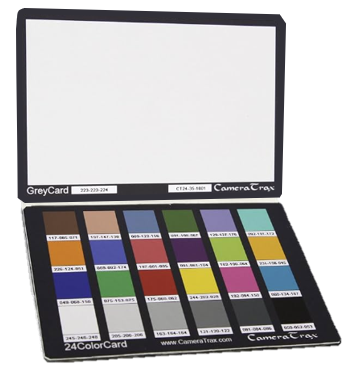
For colour calibrations under this 'old' reference standards package, you'll need one of the 'foldable' Delvotest colourcards (pictured below). This colourcard is composed of several 'colour blocks' with their respective SRGB values individually noted underneath. Every one of these colourcards has its own serial number, which should match your device's colourcard 'definition file' (we'll cover this soon on the 'step-by-step' guide below for your first calibrations). This reference standard unit should be stored in dark, cool and dry conditions (i.e., preferably 21°C, not exceeding 50% RH). It's important to handle it carefully to avoid dirt and damage, as any significant deviations will be rejected by your device.
Reference Standards Package 2: The 'New Way'
We're working hard to consolidate and streamline the reference standards needed for your DAS. As soon as the new consolidated package is ready in early 2025, we'll update it here and reach out to all DAS users with a free-of-charge shipment of the new standard. As you'll see in the next section, calibrating your device is easy — and it's about to get even smoother with our new system 😊 Watch this space!
Step-by-Step Guide
The DAS requires three core calibrations, which should be performed in order: position, uniformity, and colour. As we saw in previous articles, it's important to first make sure that your device is set to the correct date and time🔗 and has the latest software package installed🔗. Once you've got through these steps, and have your reference standards outlined above, you're ready to start! And by the way, if you run into any issues when following these steps (i.e. getting an error message or an unexpected outcome) check out this article where we cover common troubleshooting steps to take when calibrations fail🔗. [this article linked is just for Uniformity Calibrations - should we link a more general guide to troubleshooting calibrations or?]
I. Check your Colourcard ID File [these headings were labelled 'step 1', 'step 2' etc., but we can't have that because the steps within each section are called 'step 1', 'step 2' etc. to align with the way the DAS interface labels them, so I've changed it to roman numerals but feel free to rethink that]
Your Delvotest® DAS colourcard comes with an unique identifier (ID), which needs to 'match' the underlying 'Color card ID' file in the device you'll be using it for colour calibrations.
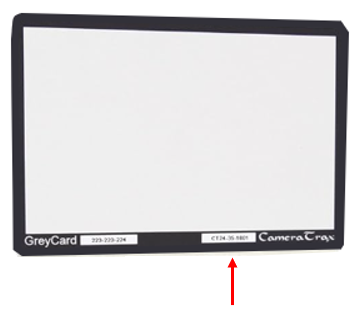
- Find your colourcard's ID number on the 'grey facing side' (pictured below). Take note of this number.
- Access your device's interface🔗 via your computer's browser and sign in as the administrator🔗.
- Go to the 'Setup' tab and find the 'Color calibration' section (pictured below).
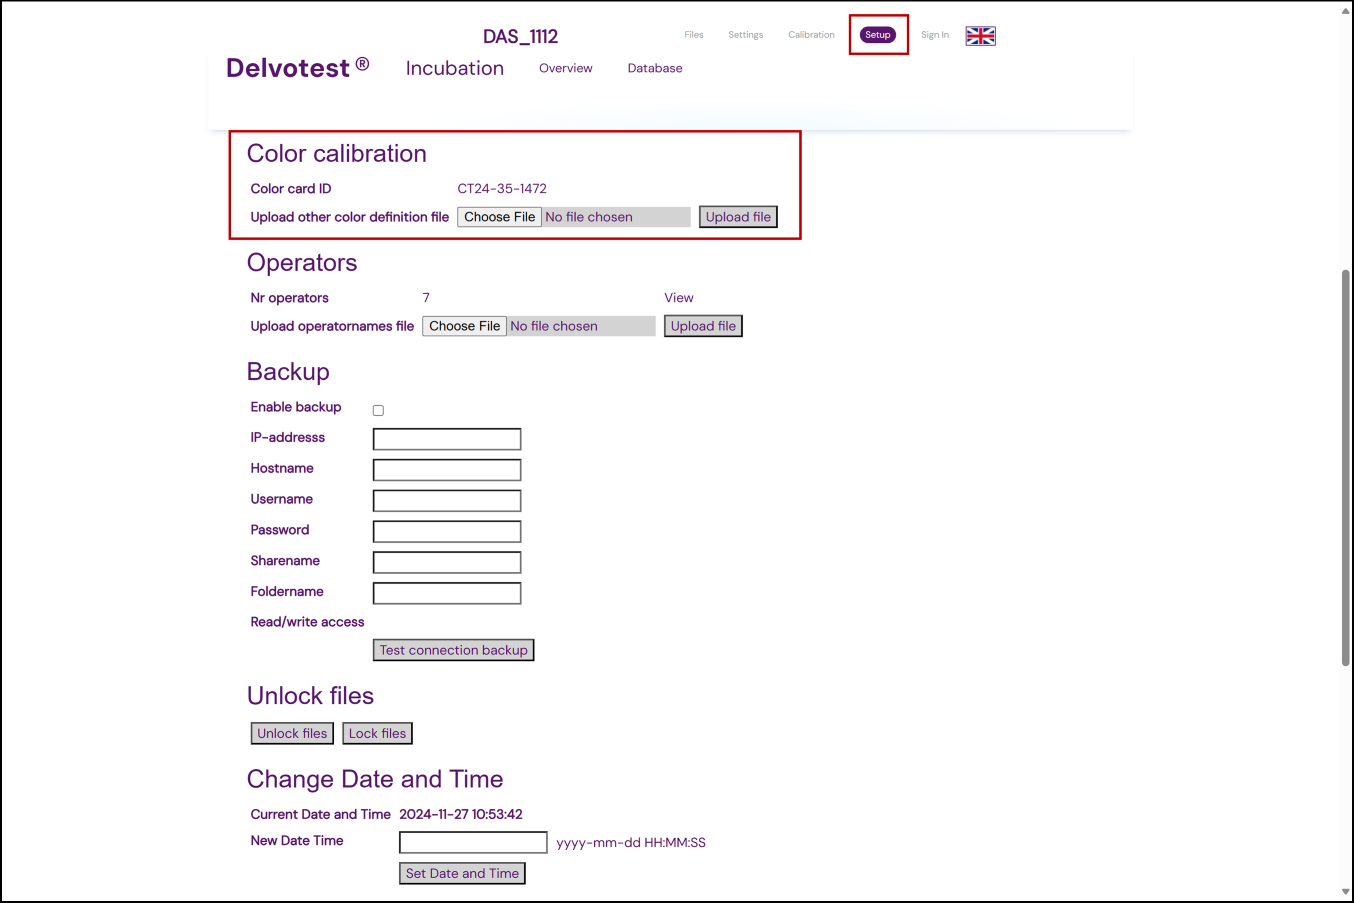
- Check if the 'Color card ID' number listed there matches the one on the physical colourcard you got with your DAS that you'll be using for this calibration process.
If this number doesn't match up, simply download the correct ID file from one of the links below. Once it's downloaded, click the 'Choose File' button to open a dialog window where you can select the downloaded file.
Once the correct file has been selected and has loaded, click the 'Upload file' button. If it worked the 'Color card ID' number listed will have updated to the one you just uploaded. And voilà — you've successfully updated your device with the correct colourcard ID file! Now it's time to calibrate your device.
II. Access the 'Calibration' tab
Go to the 'Calibration' tab on your DAS's interface. You need to be signed in🔗 to access this tab. Once there, you will be able to see a summary of when each calibration was last done (i.e., 'Date' and 'Age [days]' columns). Here you can carry out new calibrations.
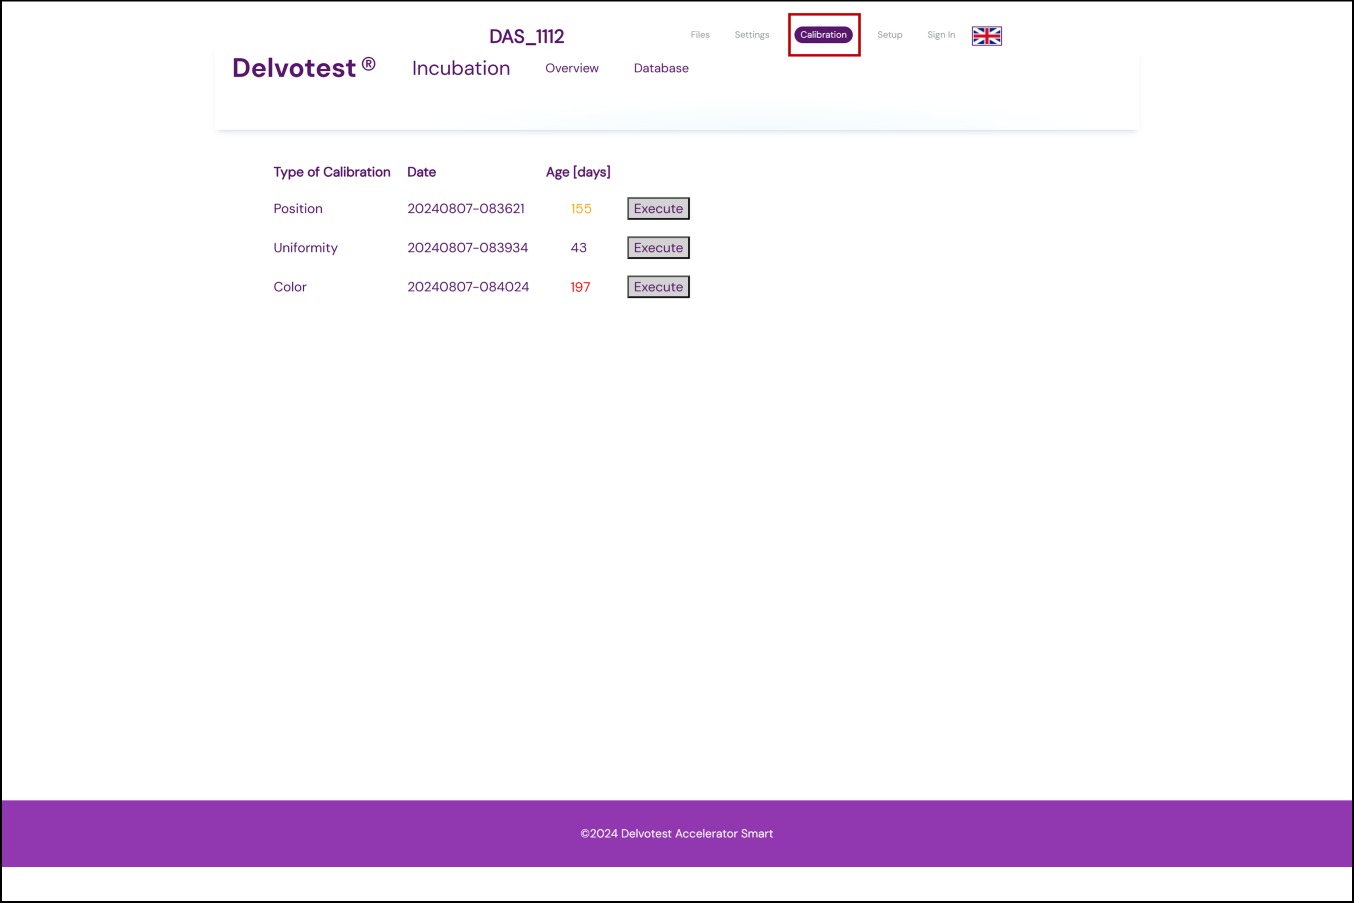
The 'Age [days]' values follow some simple colour coding based on how often you've set your device to be calibrated (which we'll explore at the end of this article). Here is what they mean:
| Colour Indication | Meaning / Description |
| 🟩 Green | Calibration is recent |
| 🟪 Purple | Calibration is within the valid performance period |
| 🟨 Orange | Calibration warning period reached i.e., recalibration due soon (customisable setting) |
| 🟥 Red | Calibration outdated and due for renewed (customisable setting) |
Now you're ready to begin executing your first calibrations from your device's interface. When you click the 'Execute' button for any of the given calibrations, the interface will take you through the steps of the calibration, below we will repeat those instructions giving more detail. Do not press the stop (⏹️) button on your device during the calibration process, as that will take your DAS out of Service Mode. If, due to an emergency, you need to stop the calibration process at some point, turn your DAS off via the power switch at the back of the device. Now, following the correct order, let's start with the 'position' calibration. [Not sure if this info should be within each calibration section, in case people skip to a certain one, e.g. if they need to review how to do one and aren't setting it up for the first time, or if having it here is and only saying it once is okay (esp. the repeating instructions and giving more detail part). Also, we haven't introduced service mode yet, so this could be a bad place to put this, but I think it might be the easiest and read okay anyway...]
III. Position Calibration
This is all about making sure your device is able to determine the exact location of individual wells within your Delvotest® plates.
Start by clicking the 'Execute' button in the Position row of the Calibration tab of your DAS's interface. You will need to be signed in as the administrator🔗. If at any point in the process you want to go back, you can press the 'Home' button on the interface to take you back one step in the calibration.
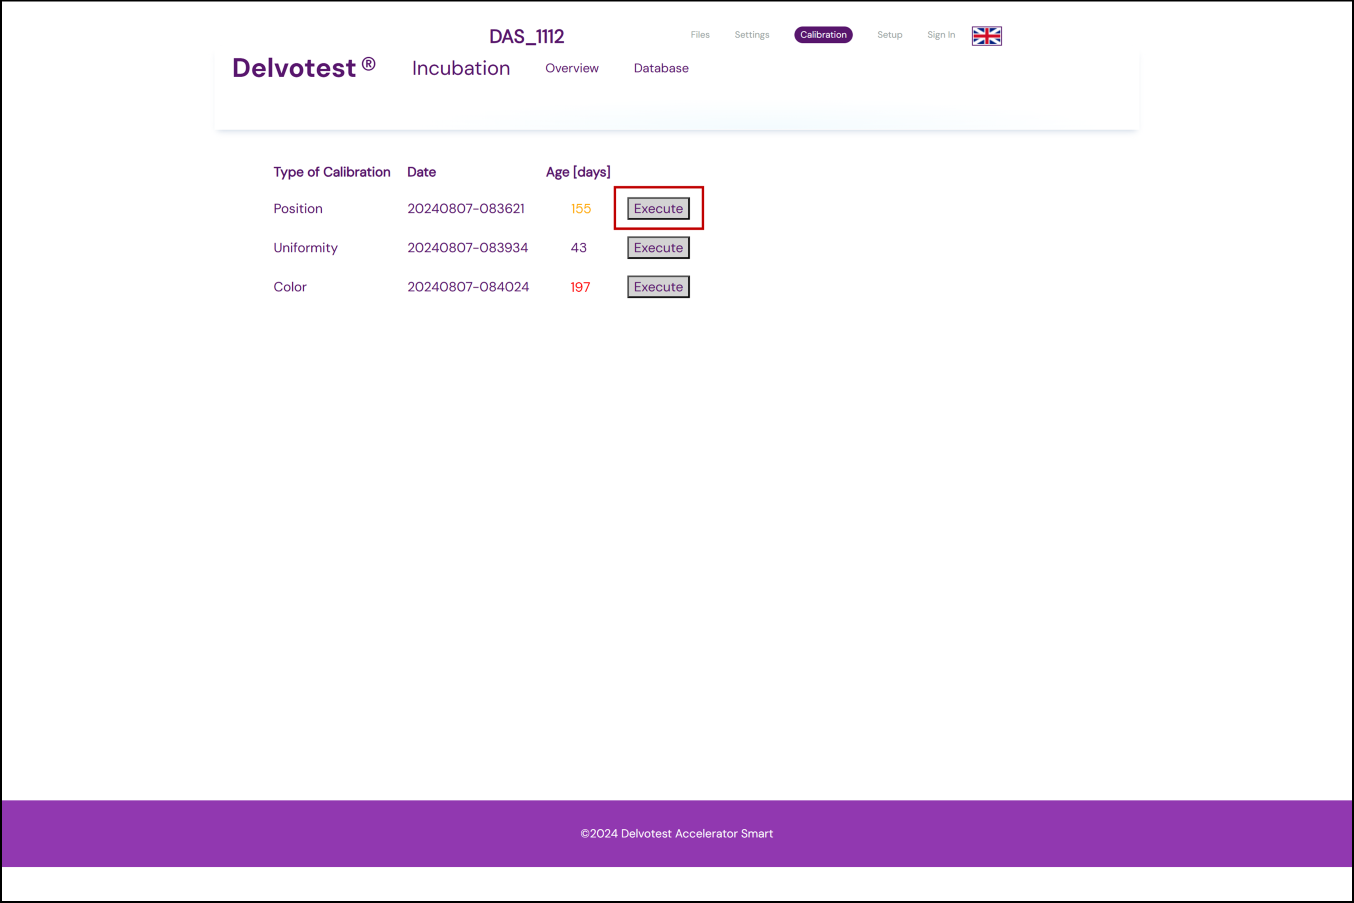
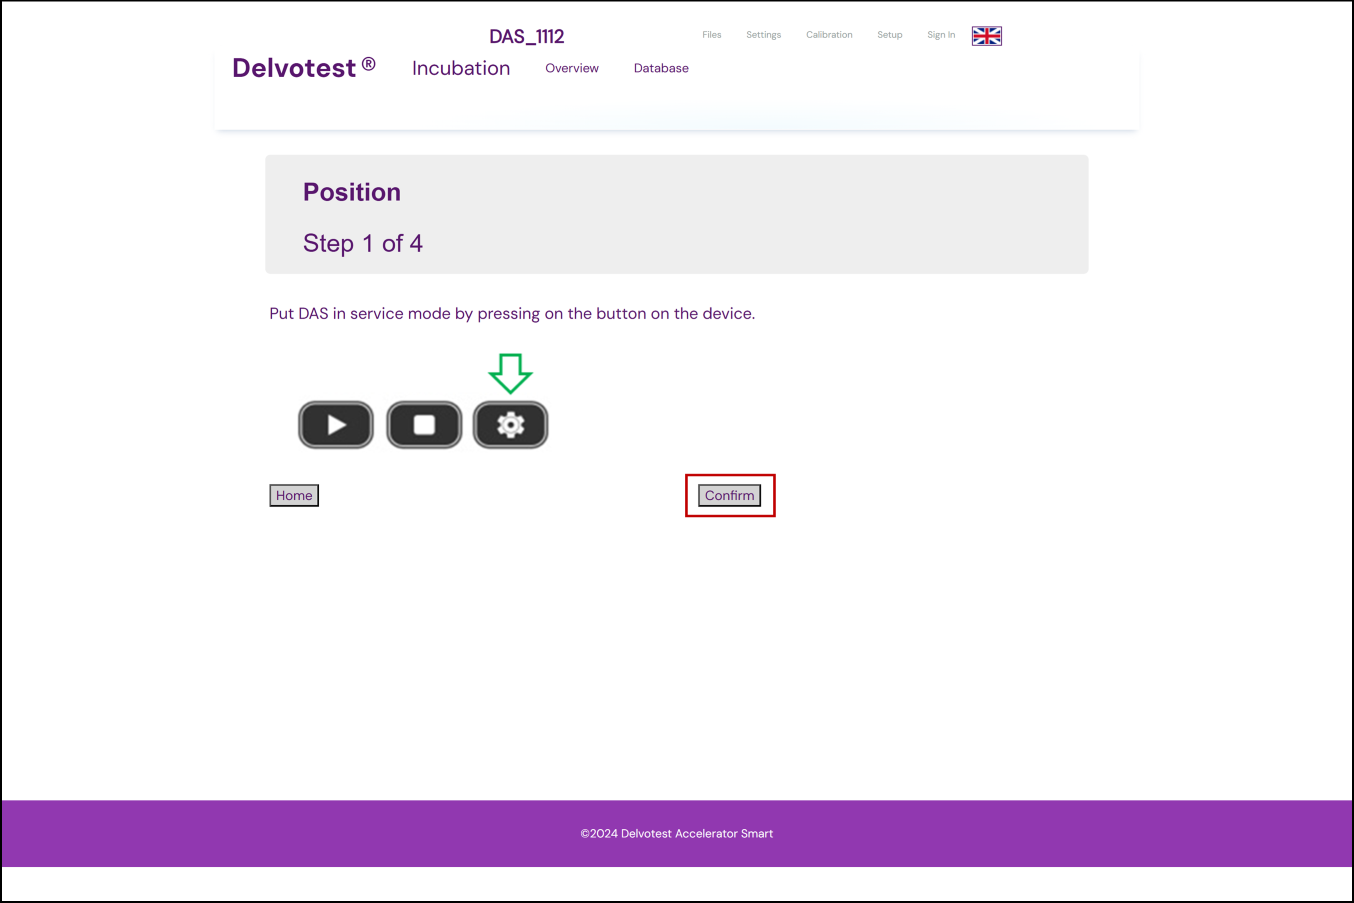
Step 1: Put your DAS into Service Mode:
- Long press (c. 10 seconds) the physical Gear button (⚙️) on your device to put your DAS into 'Service Mode'. Your DAS will need to be in 'Idle' mode to successfully activate 'Service Mode', if it is in 'Energy Saving' or 'Heating' mode, let your DAS heat up until it reaches 'Idle' mode first. When successful, your DAS display will read 'Service Mode' in the status position🔗;
- Once your device is in Service Mode, click the Confirm button to move on to the next step.
Step 2: Once the next screen has appeared:
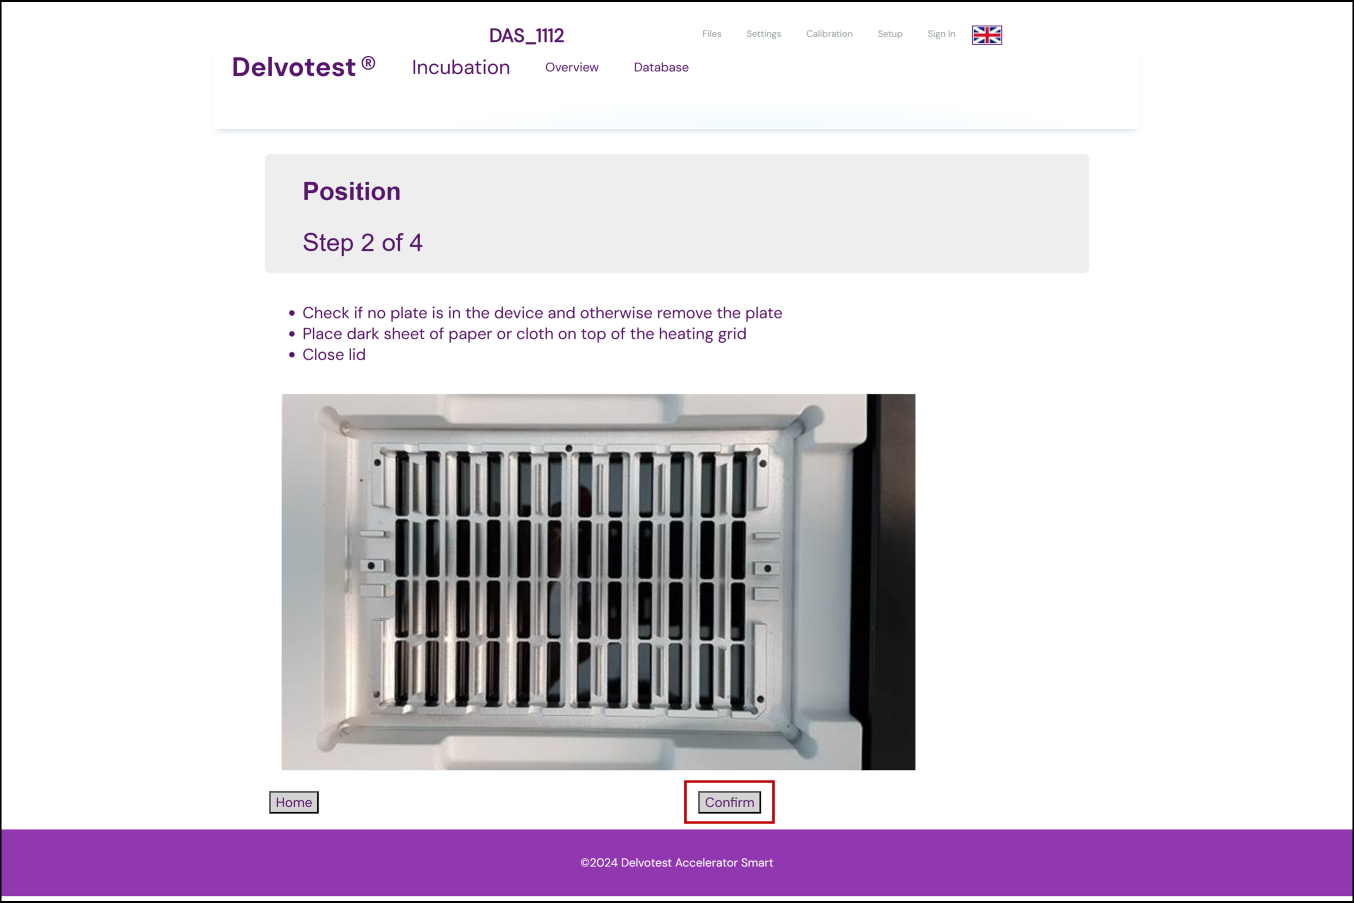
- Open the lid and make sure there are no Delvotest® plates in your device;
- Place the black piece of paper described above on top of the heating grid;
- Close the lid;
- Click the Confirm button to move on to the next step;
- Your device should now start the first phase of the position calibration, and a progress indicator will appear.
Step 3: Once your device has processed these first results, and the next screen has appeared:
- Open the lid;
- Remove the black paper;
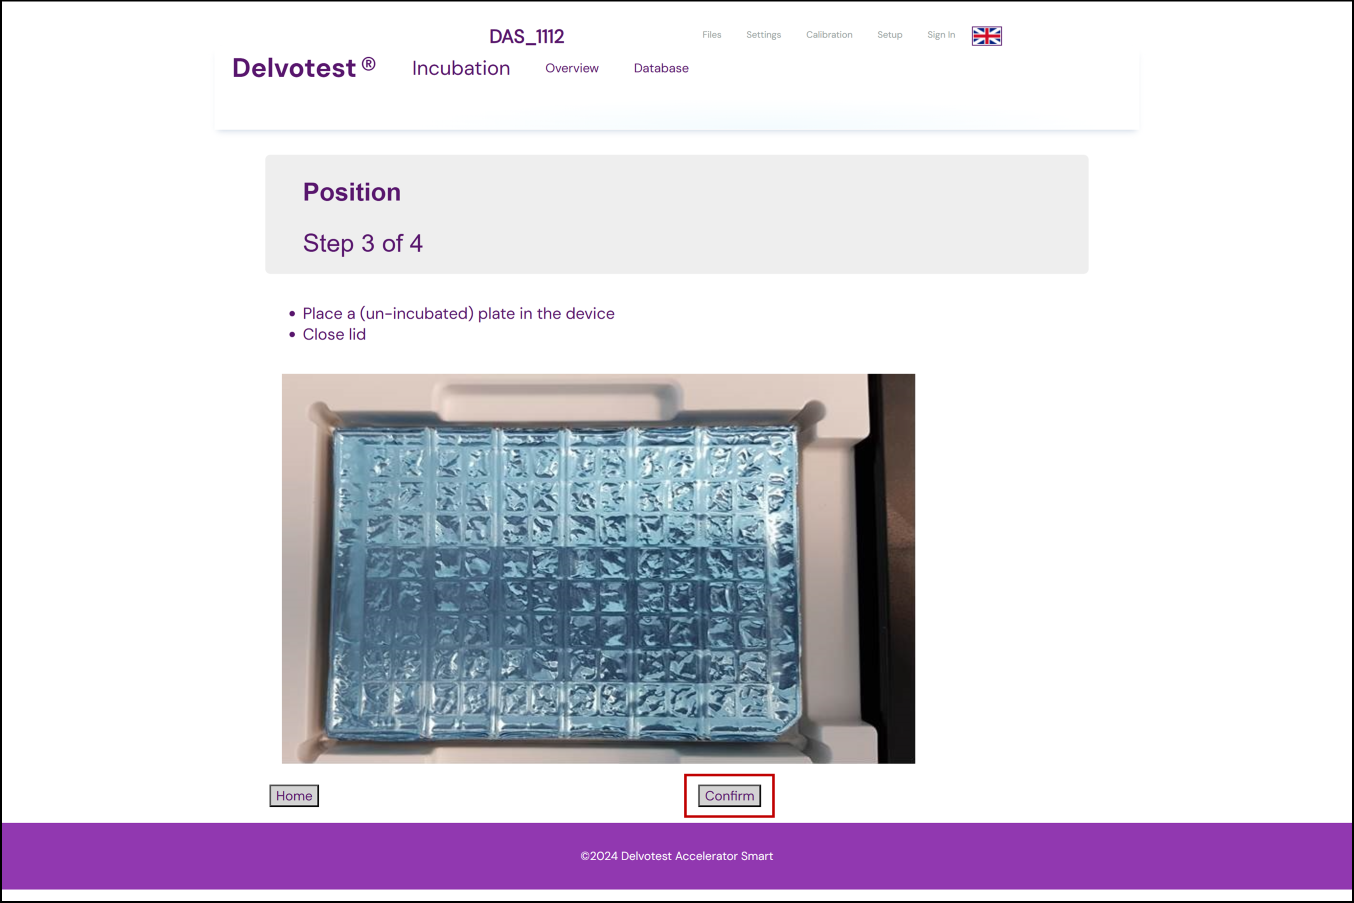
- Place an un-incubated Delvotest® plate on the grid (make sure the foil is on, and that the 'short-side' of your plate where there's a barcode sticker is facing the right-hand side of the device's grid. If you're not sure how to align your plate on the grid see this article🔗. [this article is the 'running your first test' article where we explain aligning the plate on the grid, but sending them to an article that's further into the future of the process we're supposed to be outlining is maybe not a great idea? Should 'aligning your plate to the grid' be a separate article or some other solution, or is it fine?];
- Place the black paper on top of your Delvotest® plate;
- Close the lid and;
- Click Confirm to move on;
- Your device will now start the second (and final) set of calculations for your position calibration, and a progress indicator will appear.
Step 4: Position calibration report:
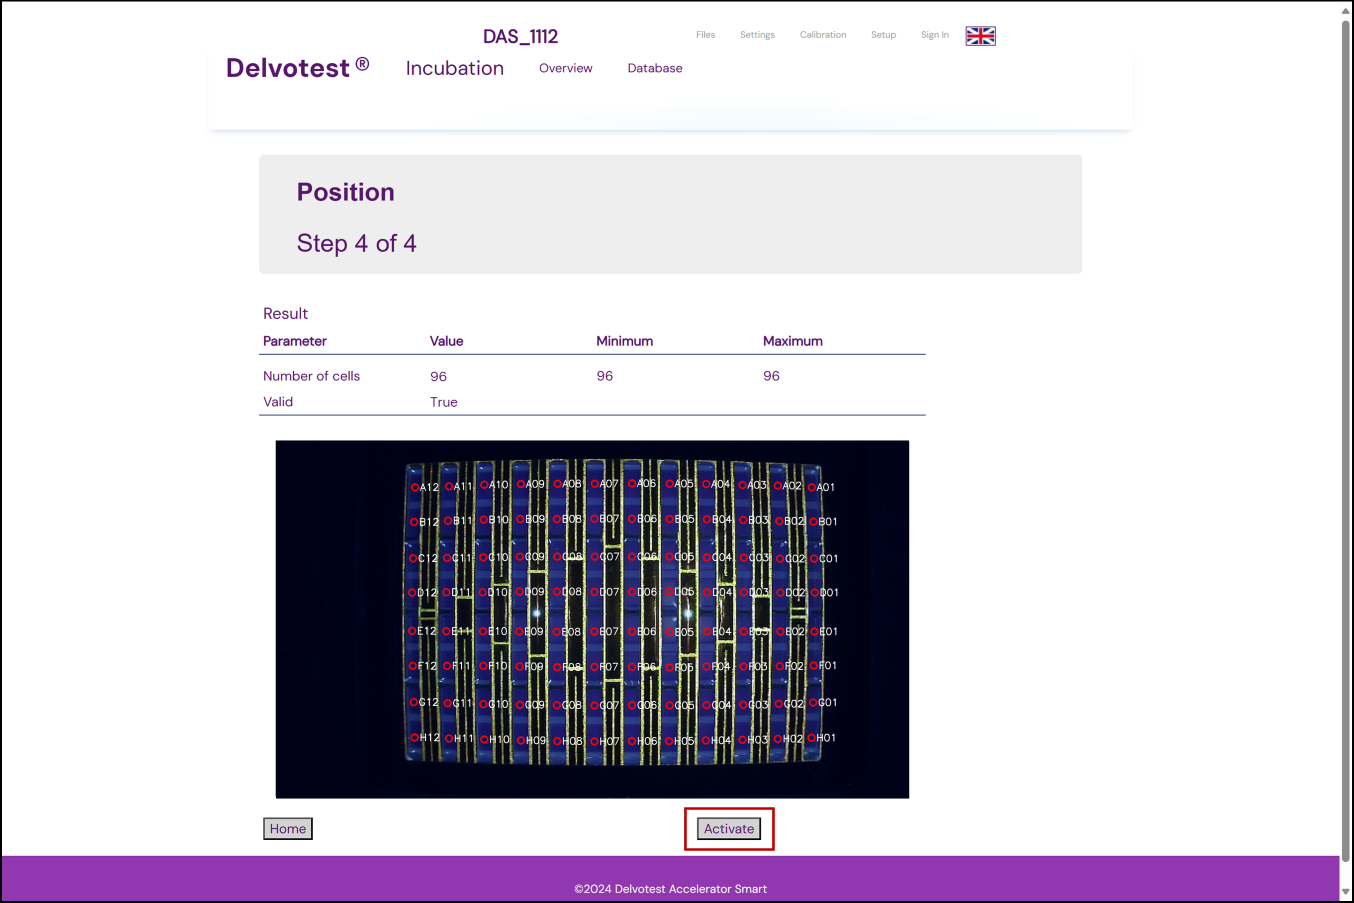
- You should now see a report on your interface;
- If the calibration has been successful, the 'Number of cells' value will be within the given range (i.e. 96~96 cells), and the Value for the Valid row will read True;
- Now click the Activate button in the lower right hand corner to initiate the calibration results;
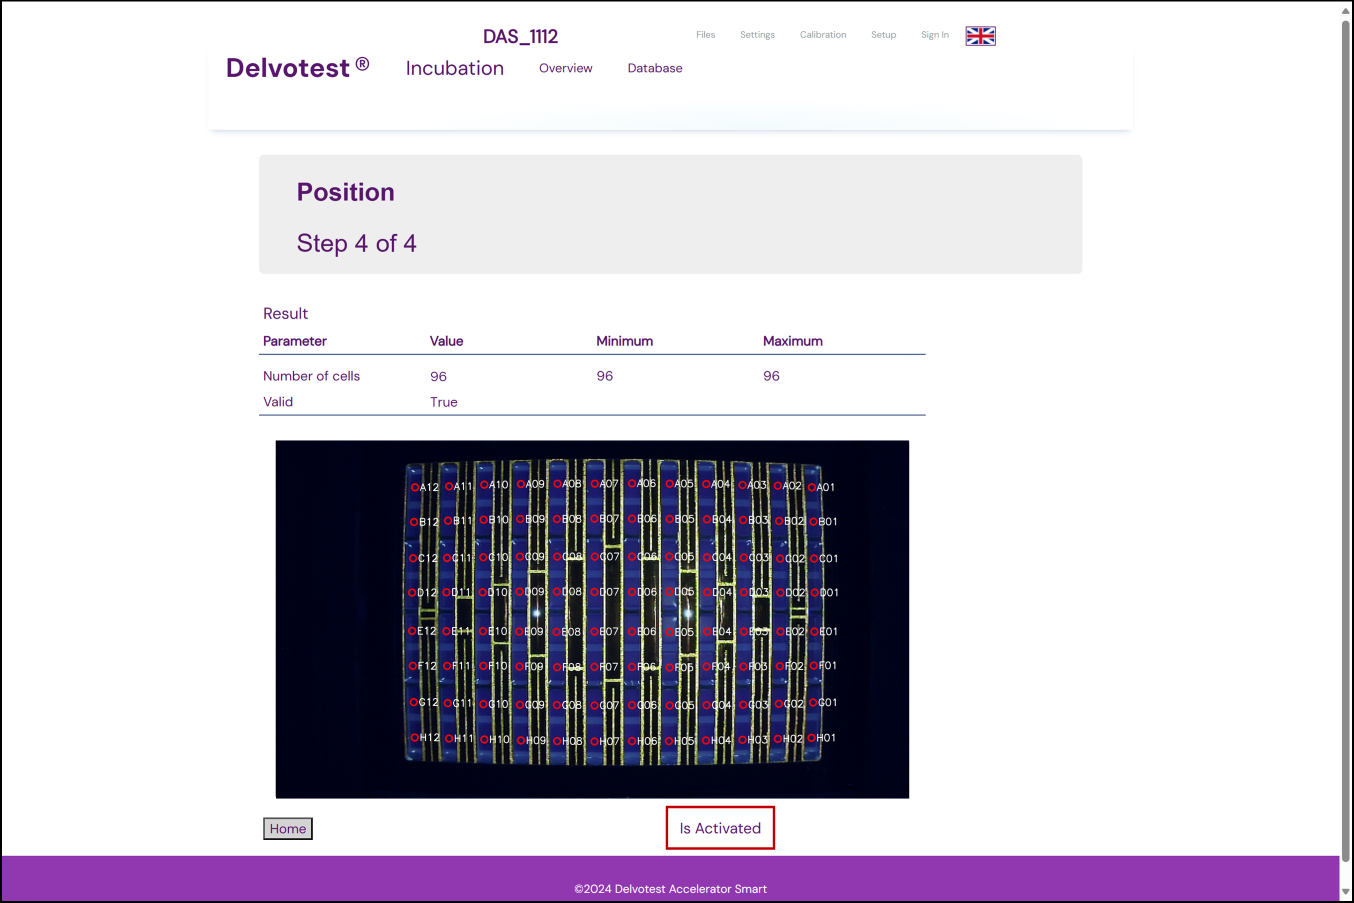
- Once clicked, the button will disappear and in its place text will read "Is Activated";
- If the calibration was unsuccessful, the 'Value' for the 'Valid' row will read 'False' and there will not be an 'Activate' button to click. In this case you will need to redo the calibration, for troubleshooting tips see this article🔗 [again, this article is for Uniformity calibrations only, so either that article needs to be edited or a new article needs to be linked here];
- Click the Home button.
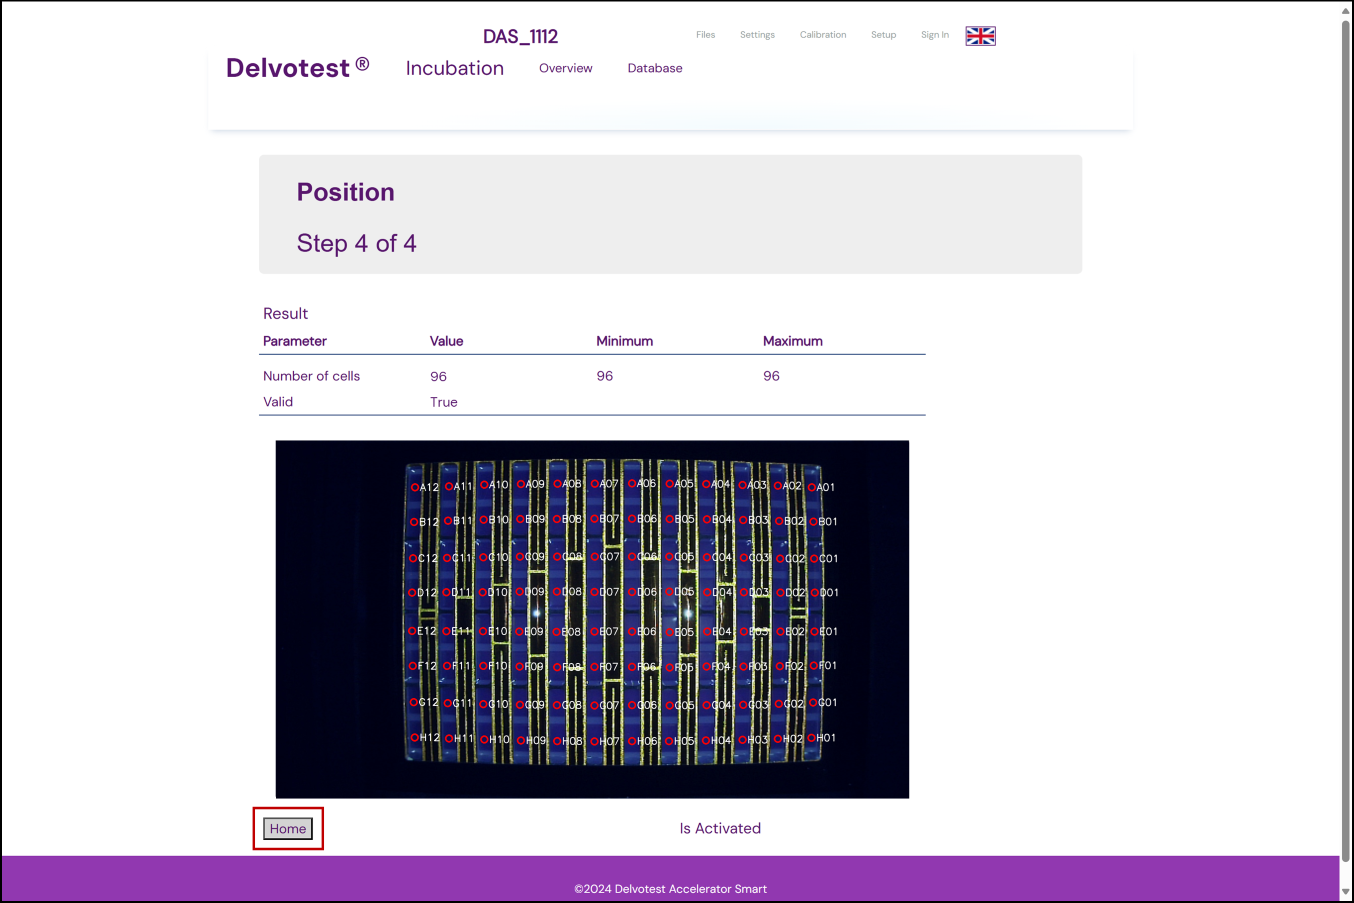
Step 5: Post actions
- Open the lid;
- Remove the black paper sitting on top of your Delvotest® plate;
- Remove the un-incubated Delvotest® plate from the grid. This plate can be returned to cool storage and used as normal for a test in the future;
- Close the lid;
- If you are not doing any other calibrations at this time press the physical stop (⏹️) button on DAS to leave 'Service Mode', make sure your DAS's display no longer reads 'Service Mode' to ensure you have been successful;
- Press the Home button on your interface in your browser;
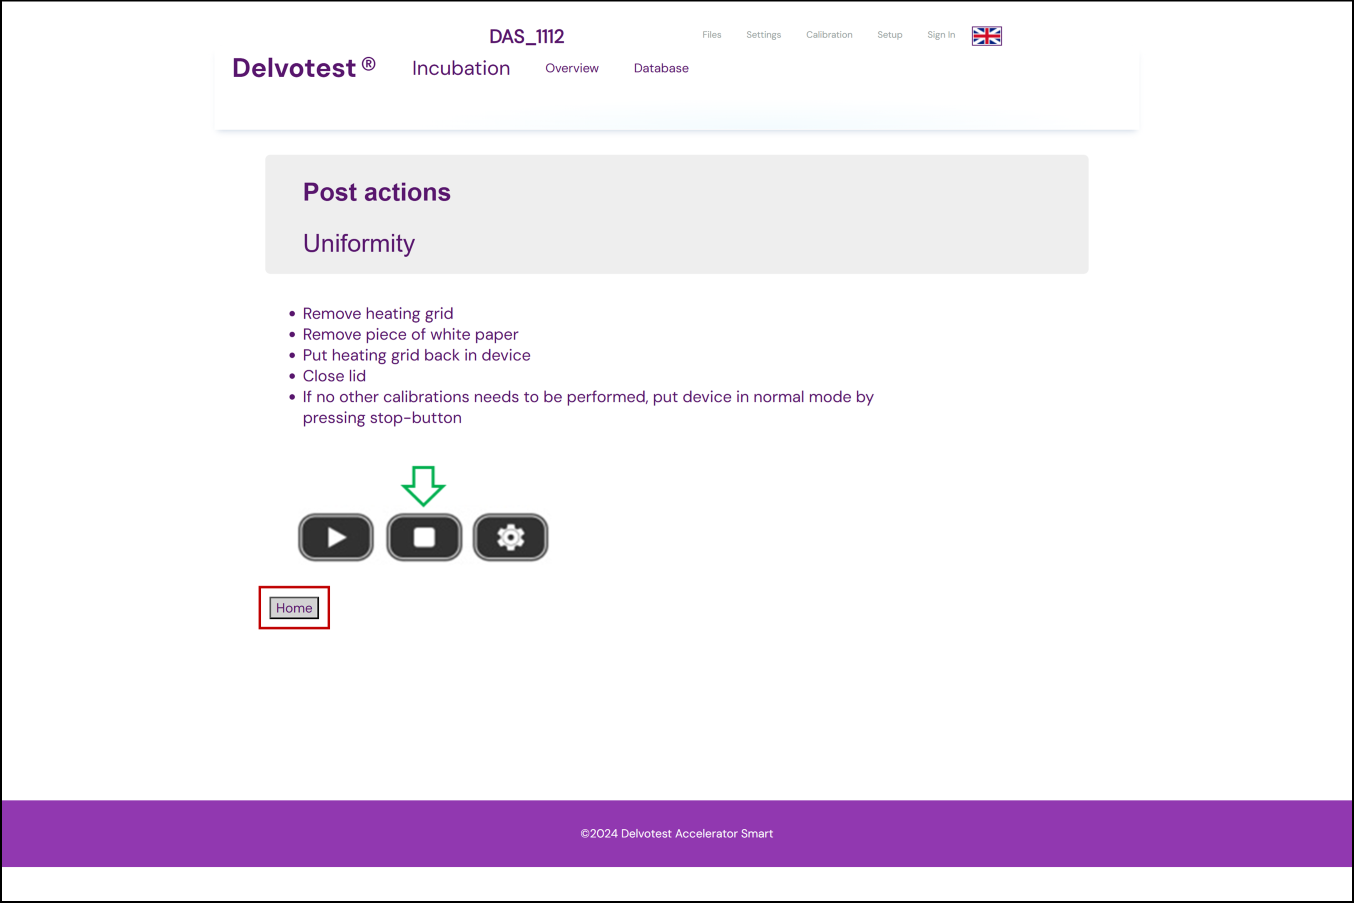
- This will return you to the Calibration tab home screen, where, if your position calibration was successful, the 'Age [days]' digit in the 'Position' row should now read '0' in green, indicating 0 days since your last position calibration was successfully done.
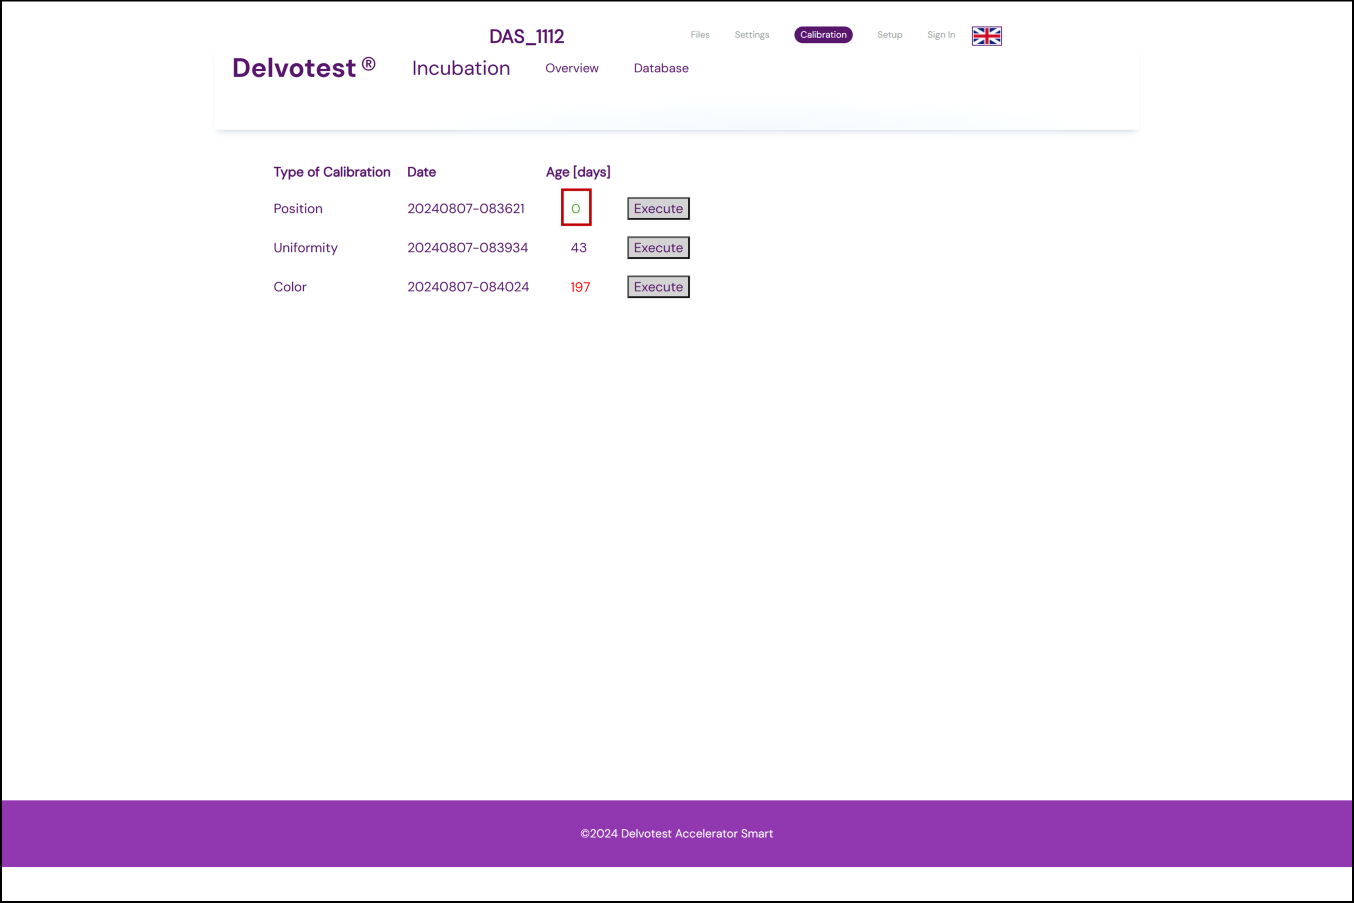
[Possible we need to replace the photos from the screenshots showing the positioning of the plate or other things?]
Now it's time to get ready for executing the next calibration: colour.
IV. Uniformity Calibration
This is all about making sure the lighting distribution across your Delvotest® plate is even and consistent.
Start by clicking the 'Execute' button in the Uniformity row of the Calibration tab of your DAS's interface. You will need to be signed in as the administrator🔗. The interface will now lead you through instructions of how to do the Uniformity calibration, we will elaborate on those instructions here. If at any point in the process you want to go back, you can press the 'Home' button on the interface to take you back one step in the calibration.
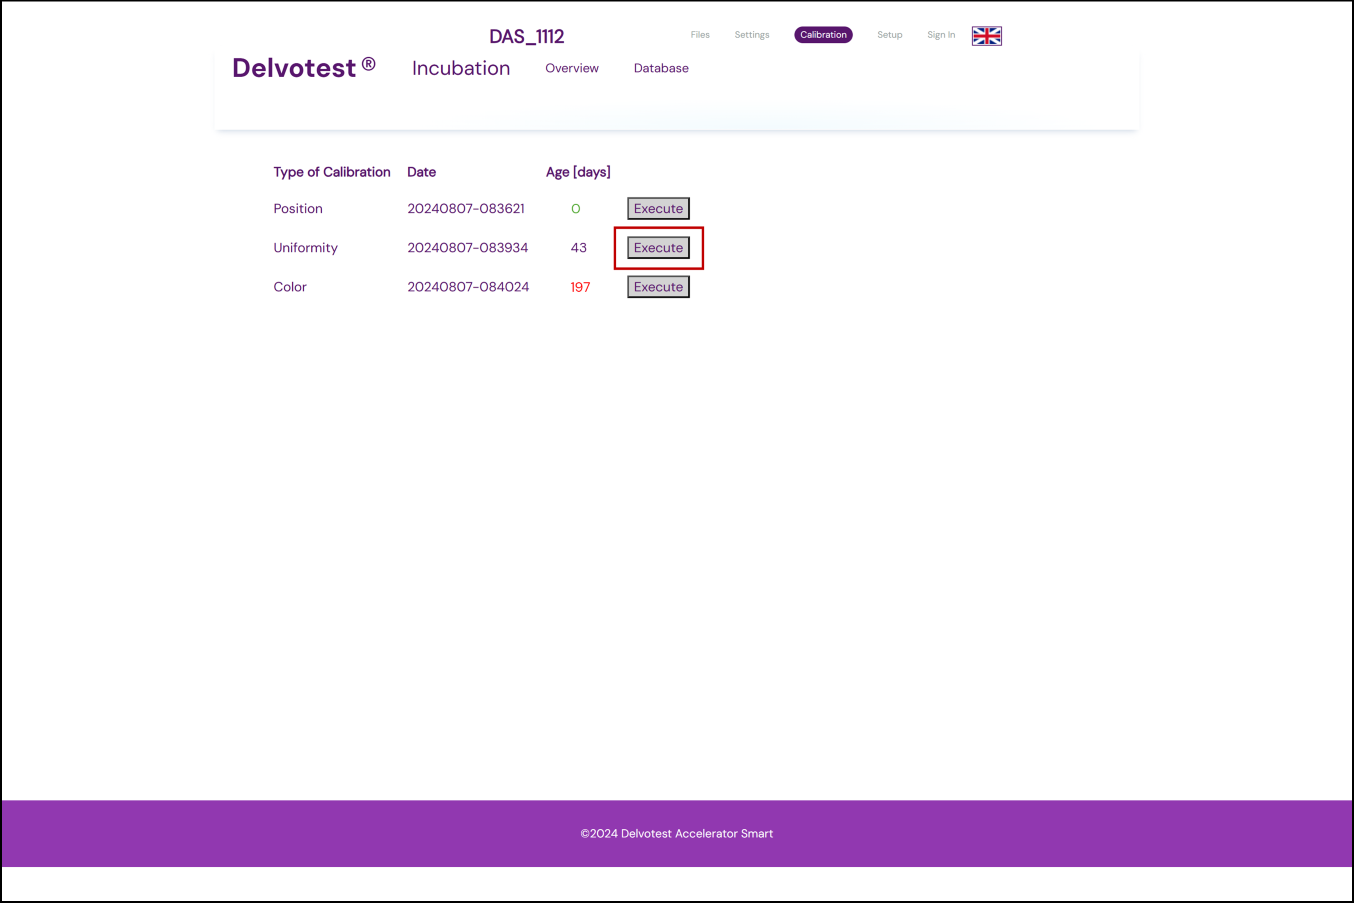
Step 1: Put your DAS into Service Mode:
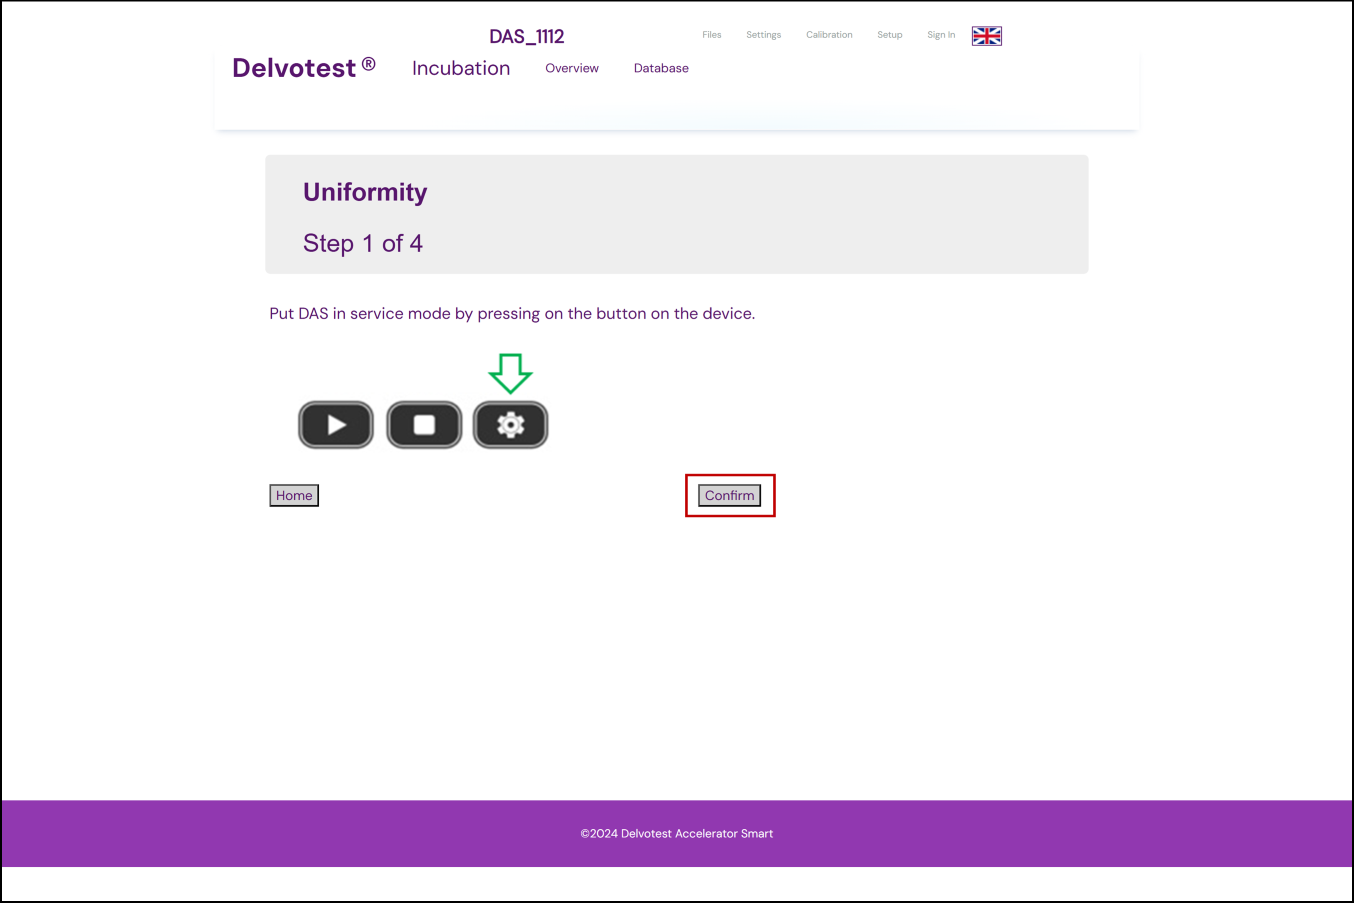
- Long press (c. 10 seconds) the physical Gear button (⚙️) on your device to put your DAS into 'Service Mode'. Your DAS will need to be in 'Idle' mode to successfully activate 'Service Mode', if it is in 'Energy Saving' or 'Heating' mode, let your DAS heat up until it reaches 'Idle' mode first. When successful, your DAS display will read 'Service Mode' in the status position🔗;
- Once your device is in Service Mode, click the Confirm button to move on to the next step.
Step 2: Remove heating grid:
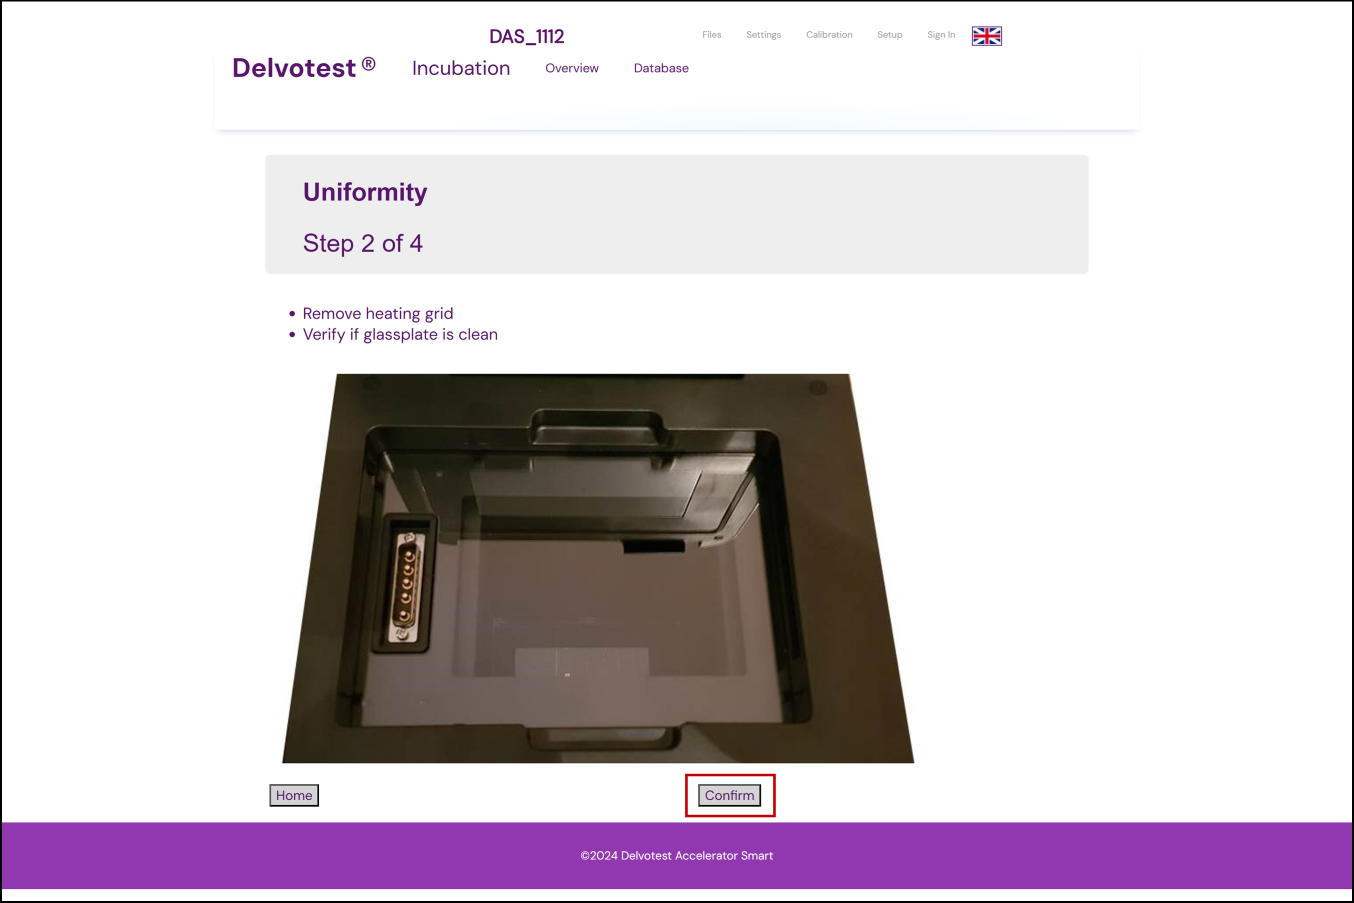
- Open the lid and make sure there are no Delvotest® plates in your device;
- Remove the heating grid; [more detail about taking the heating grid out of the device]
- Check the glass underneath the grid is clean, without any smudges, dirt or dust particles.
Need to clean the glass? Then be careful — here are some tips🔗. [correct link?] - Once you're sure the glass is clean, click the Confirm button to move on to the next step.
Step 3: Once the next screen has appeared:
- Place the cut-to-size white matte piece of paper discussed above onto the clean glass plate, making sure the right side of the glass is completely covered as seen in the picture below;
- Put the heating grid back on, locking it on top of the white paper;
- Close the lid;
- Click the Confirm button;
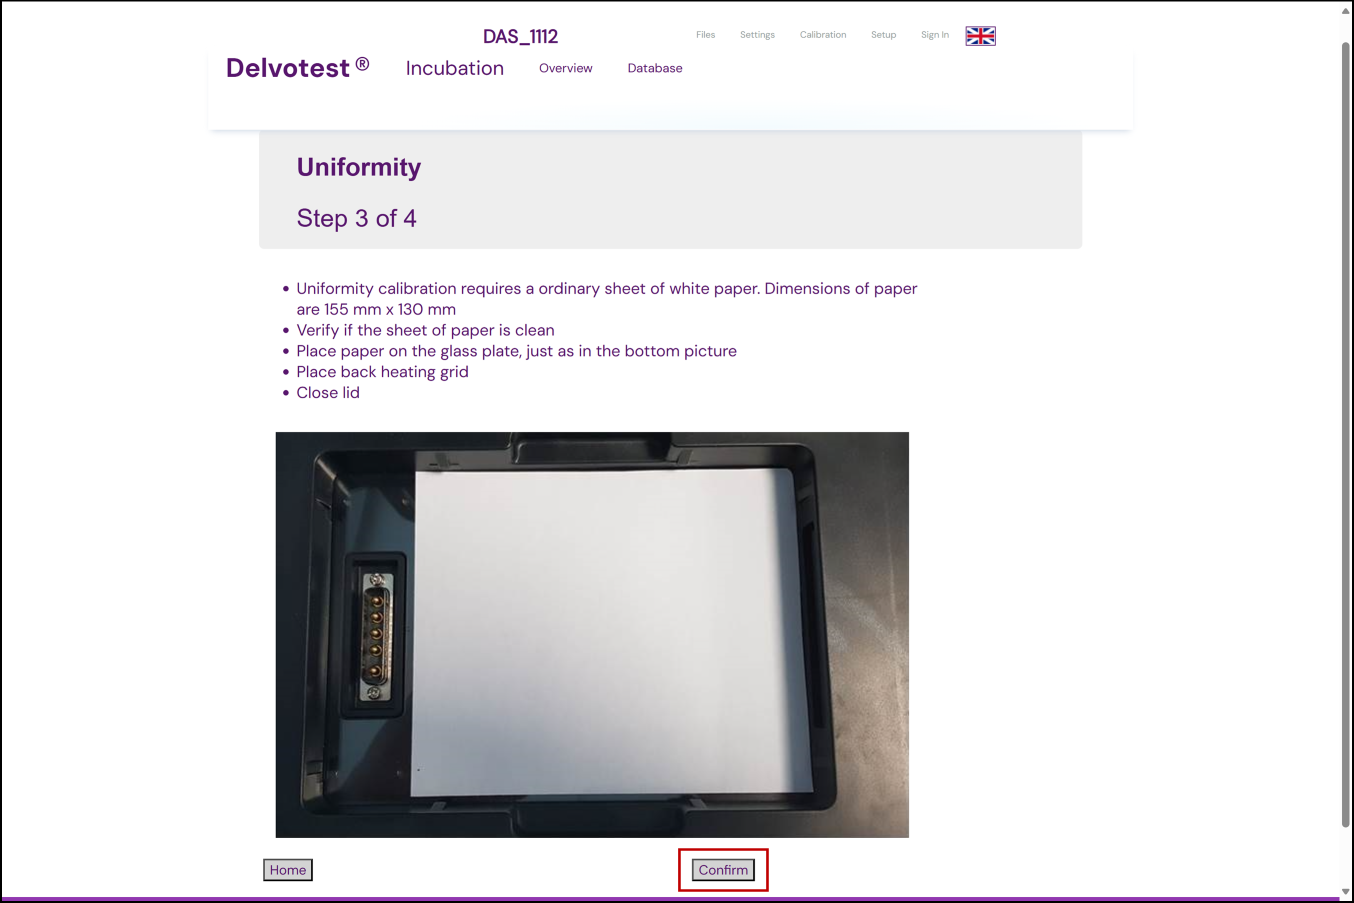
- Your device should start processing and calculating the results, and your interface will show a progress indicator until it's finished.
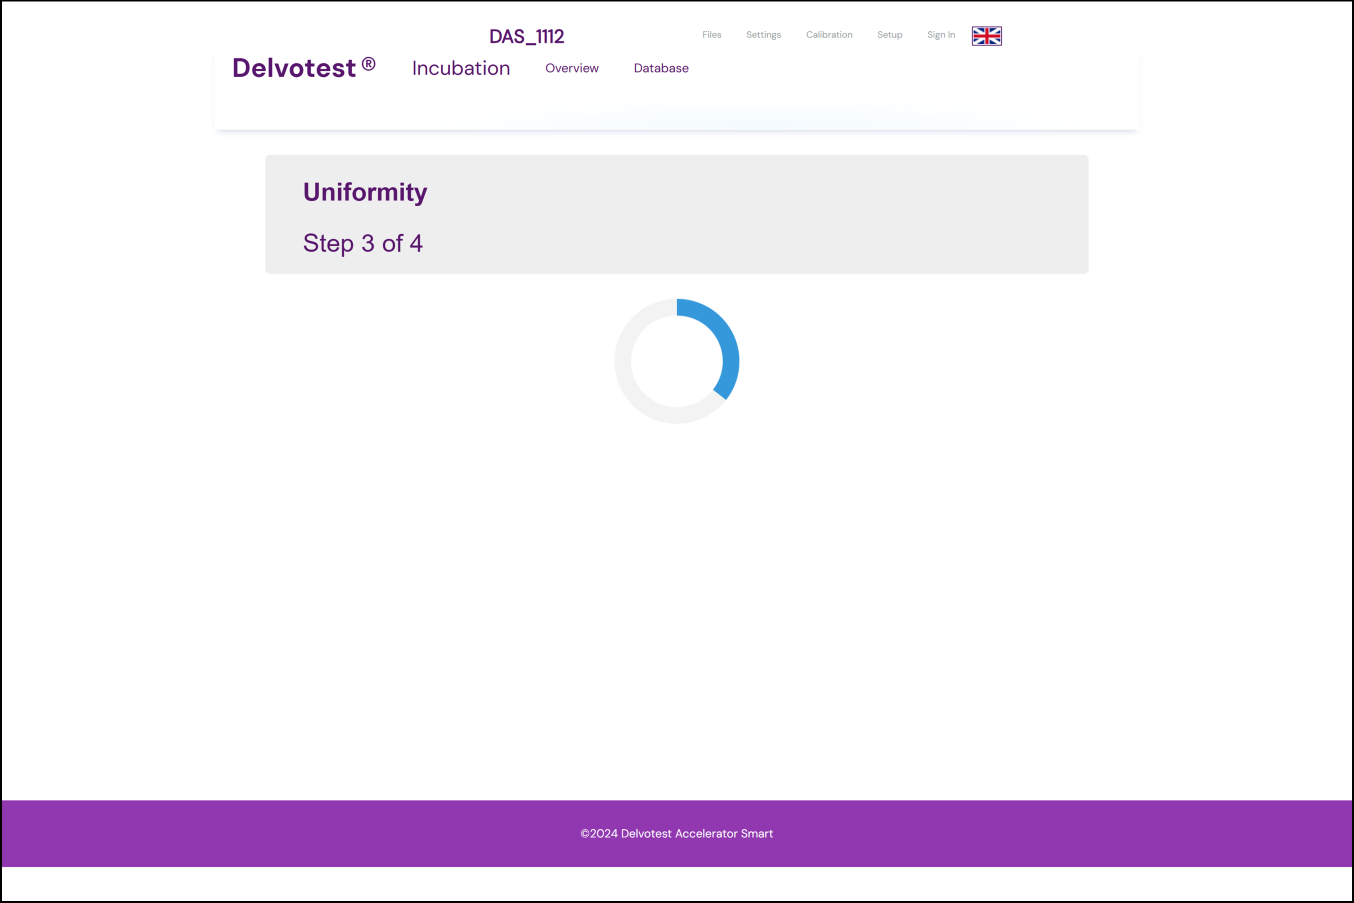
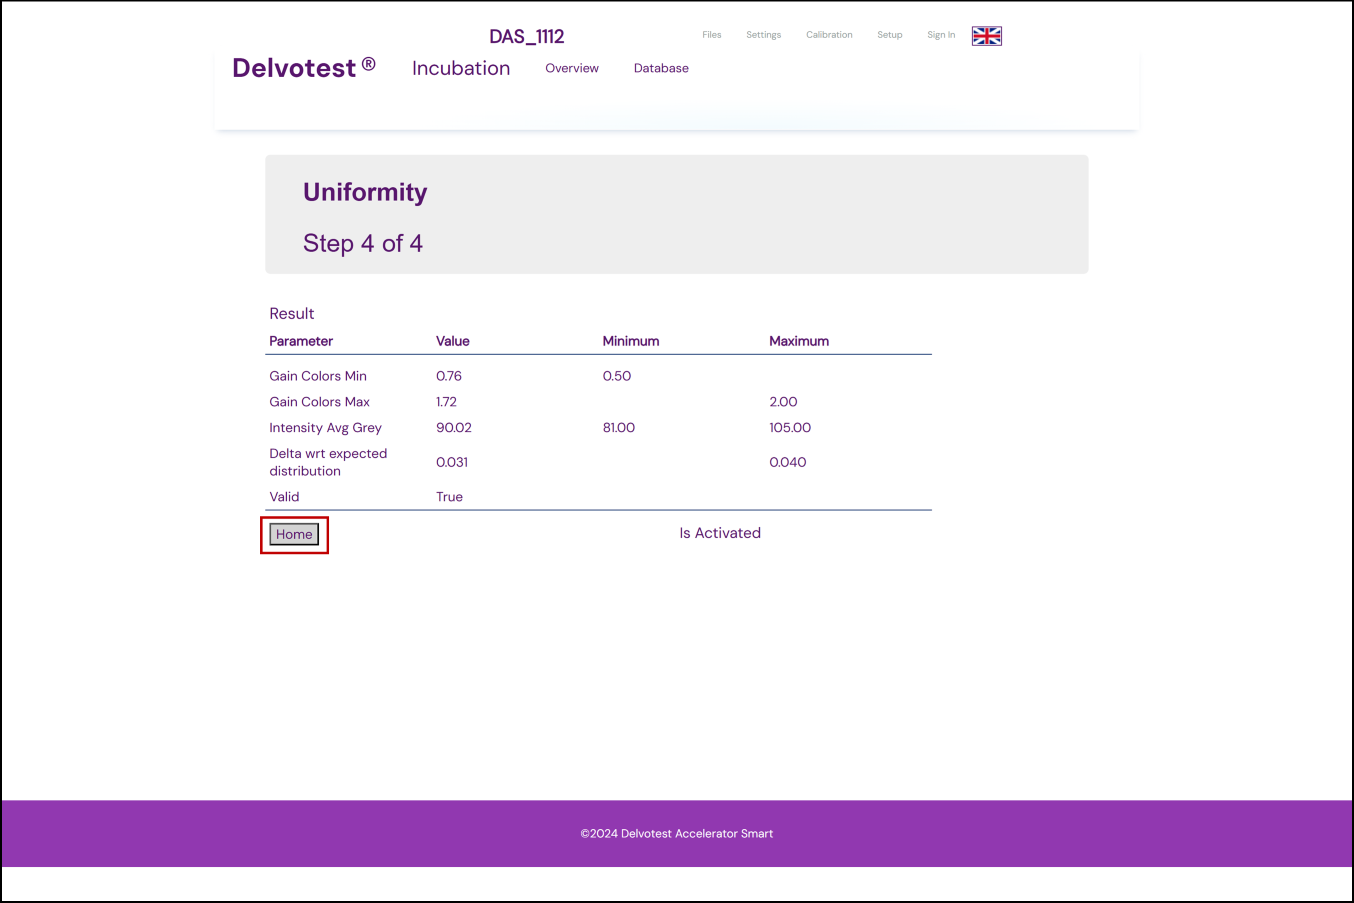
Step 4: Uniformity report:
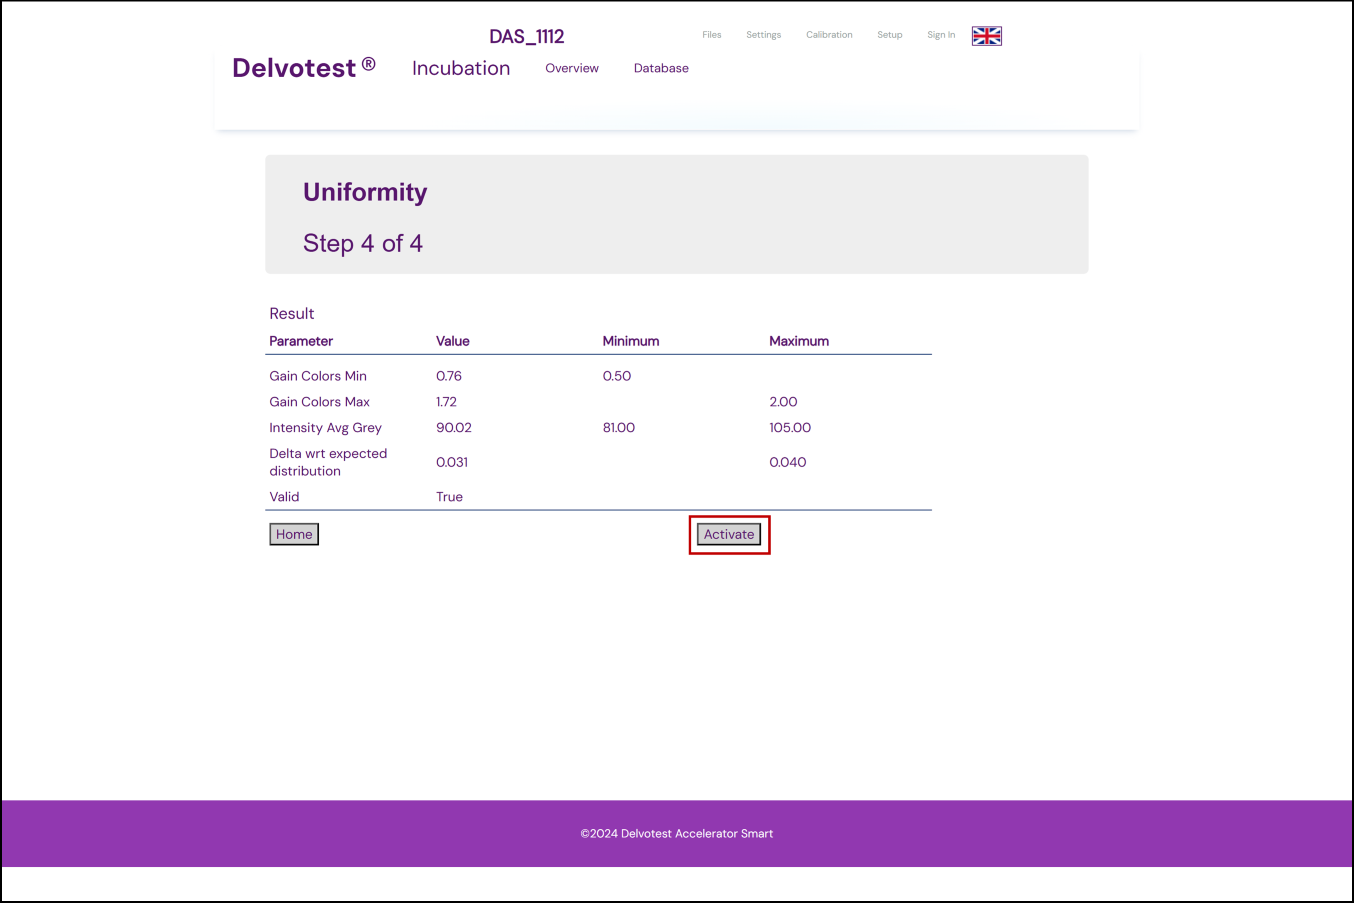
- You should now see a report on your interface;
- If the calibration has been successful, all results will be within the 'Minimum' ~ 'Maximum' numerical ranges shown in the table, and the Value for the Valid row will read True;
- Now click the Activate button in the lower right hand corner to initiate the calibration results;
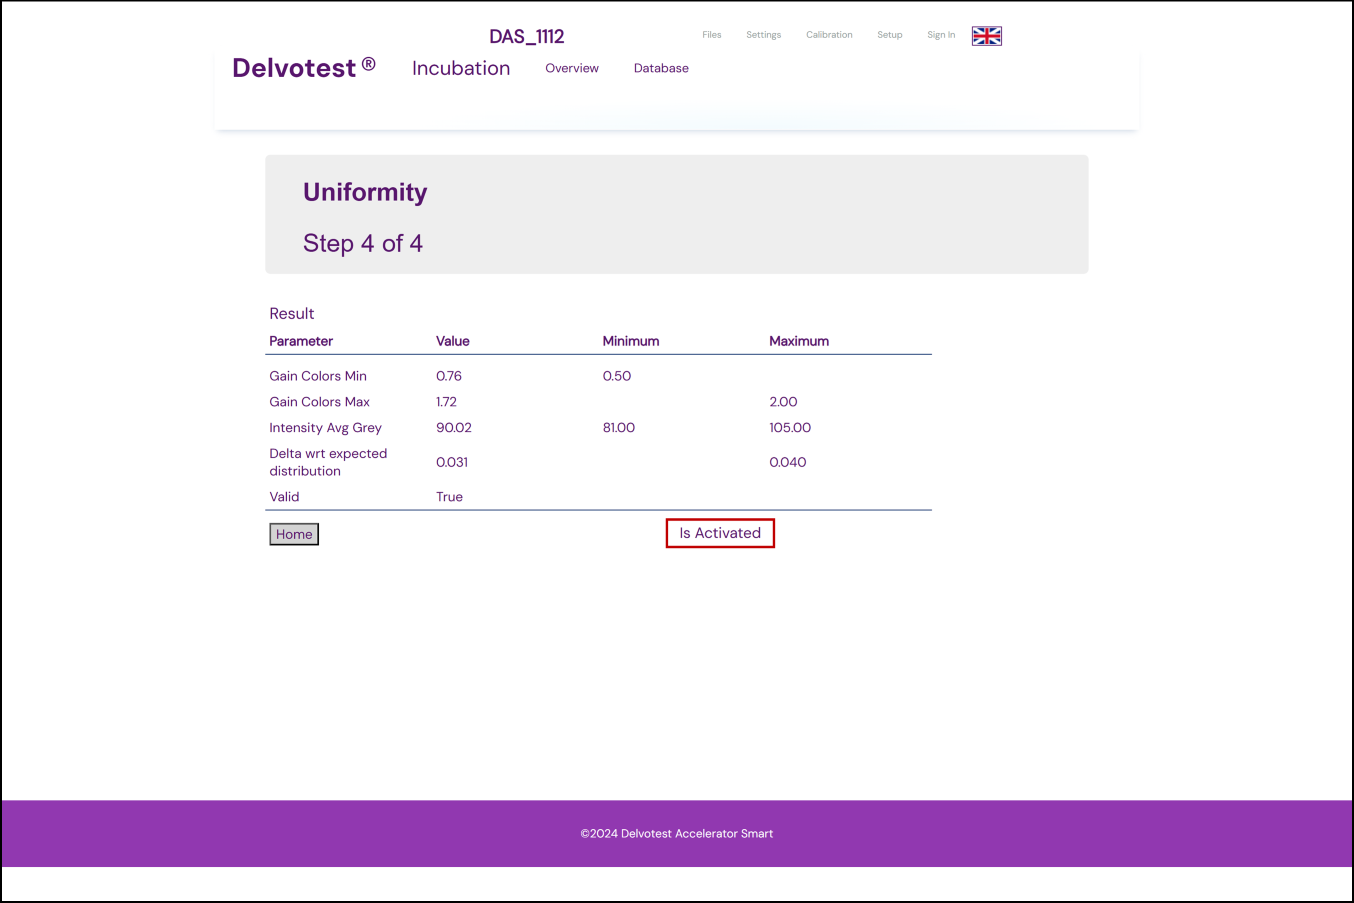
- Once clicked, the button will disappear and in its place text will read "Is Activated";
- If the calibration was unsuccessful, the 'Value' for the 'Valid' row will read 'False' and there will not be an 'Activate' button to click. In this case you will need to redo the calibration, for troubleshooting tips see this article🔗 [again, this article is for Uniformity calibrations only, so either that article needs to be edited or a new article needs to be linked here];
- Click the Home button.
Step 5: Post actions:
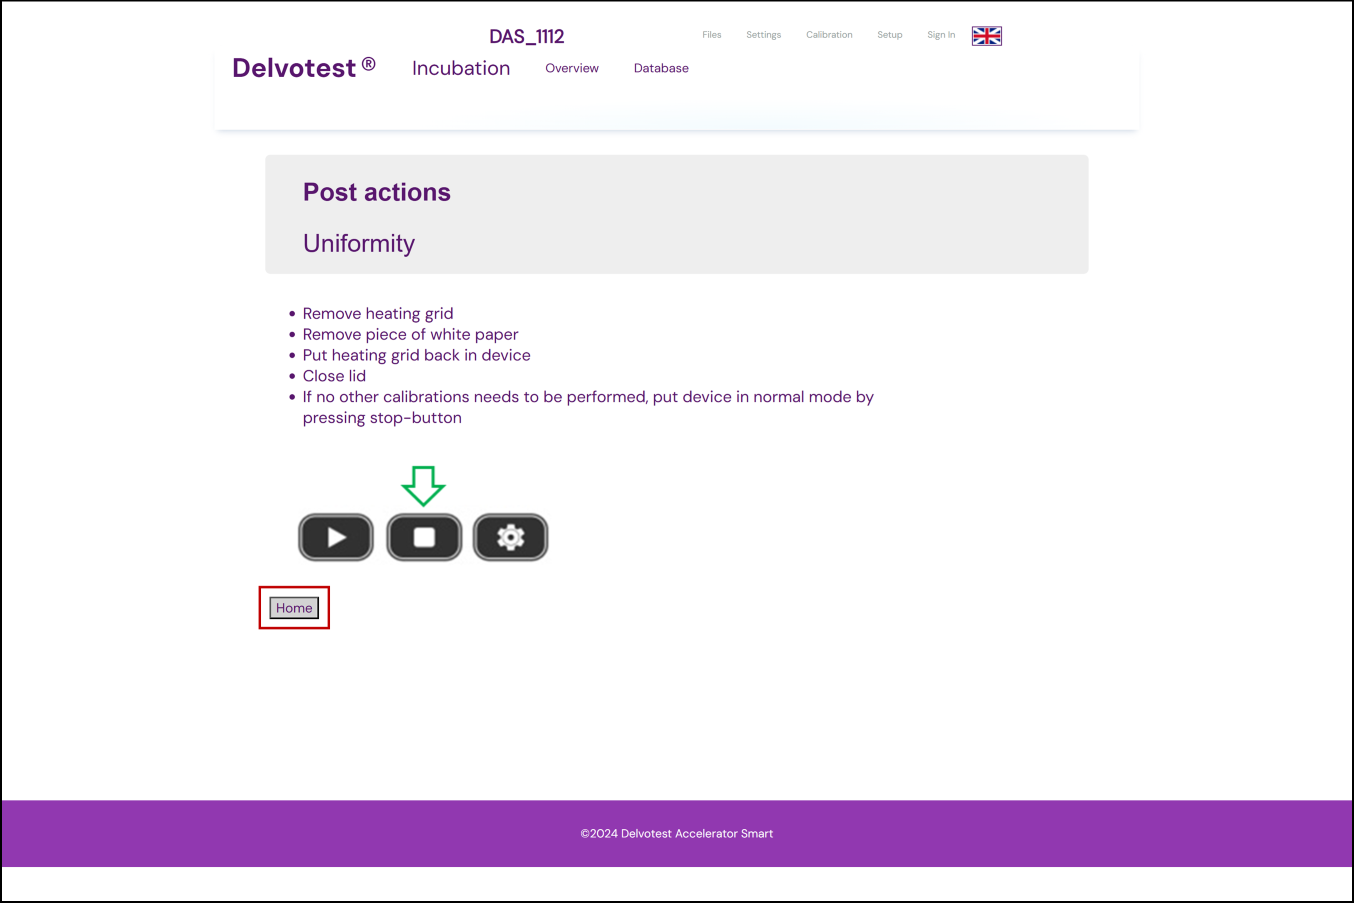
- Open the lid;
- Remove the heating grid;
- Remove the piece of white paper from the glass;
- Re-insert the heating grid back into the DAS, ensuring it clicks into position;
- Close the lid;
- If you are not doing any other calibrations at this time press the physical stop (⏹️) button on DAS to leave 'Service Mode', make sure your DAS's display no longer reads 'Service Mode' to ensure you have been successful;
- Press the Home button on your interface in your browser;
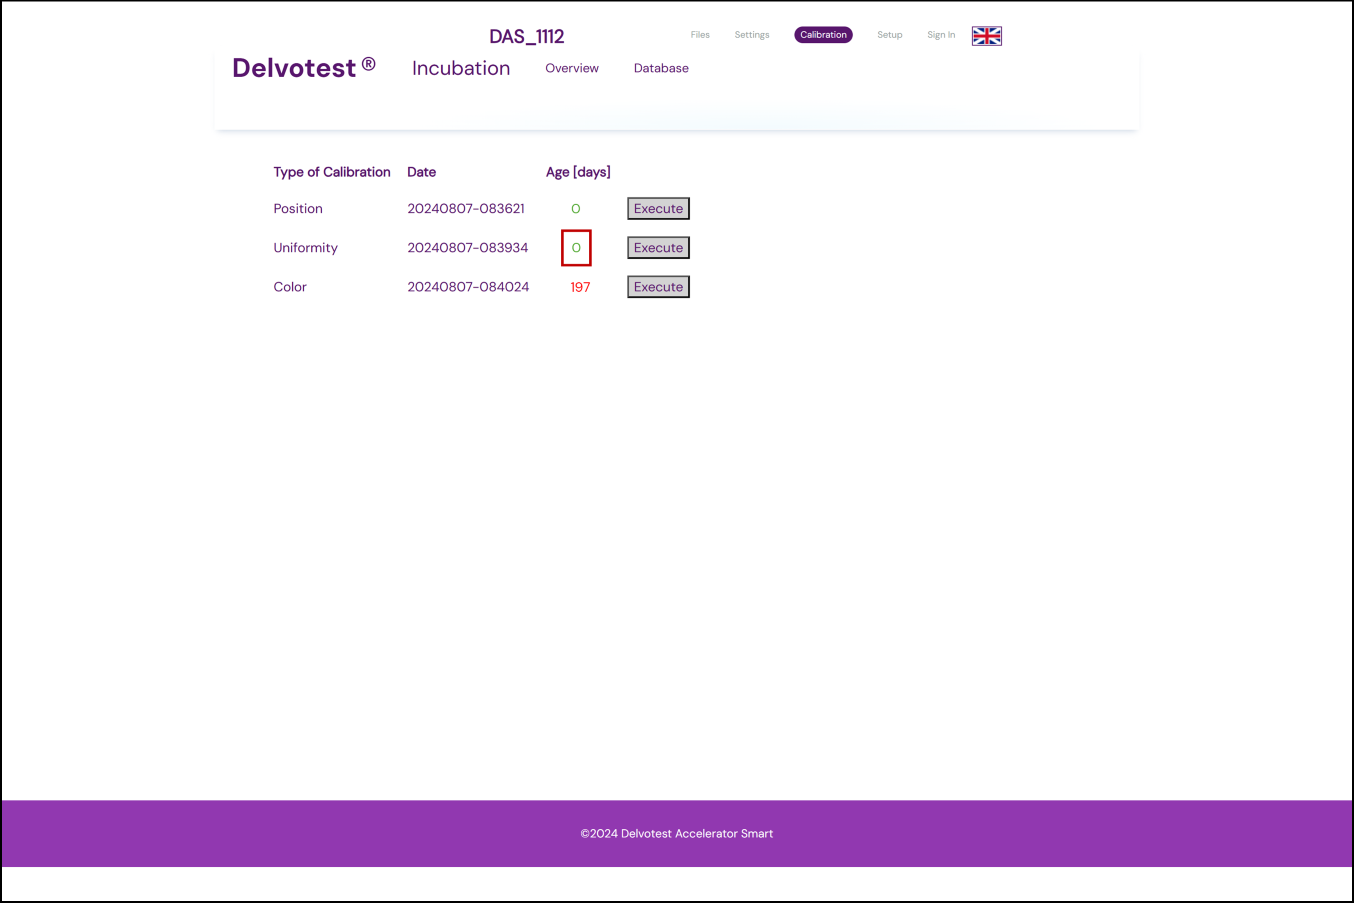
- This will return you to the Calibration tab home screen, where, if your position calibration was successful, the 'Age [days]' digit in the 'Position' row should now read '0' in green, indicating 0 days since your last position calibration was successfully done.
Now it's time to get ready for executing the next calibration: colour.
V. Colour Calibration
This is all about making sure your device is able to interpret your Delvotest® plate colours consistently, vital for giving accurate results when testing.
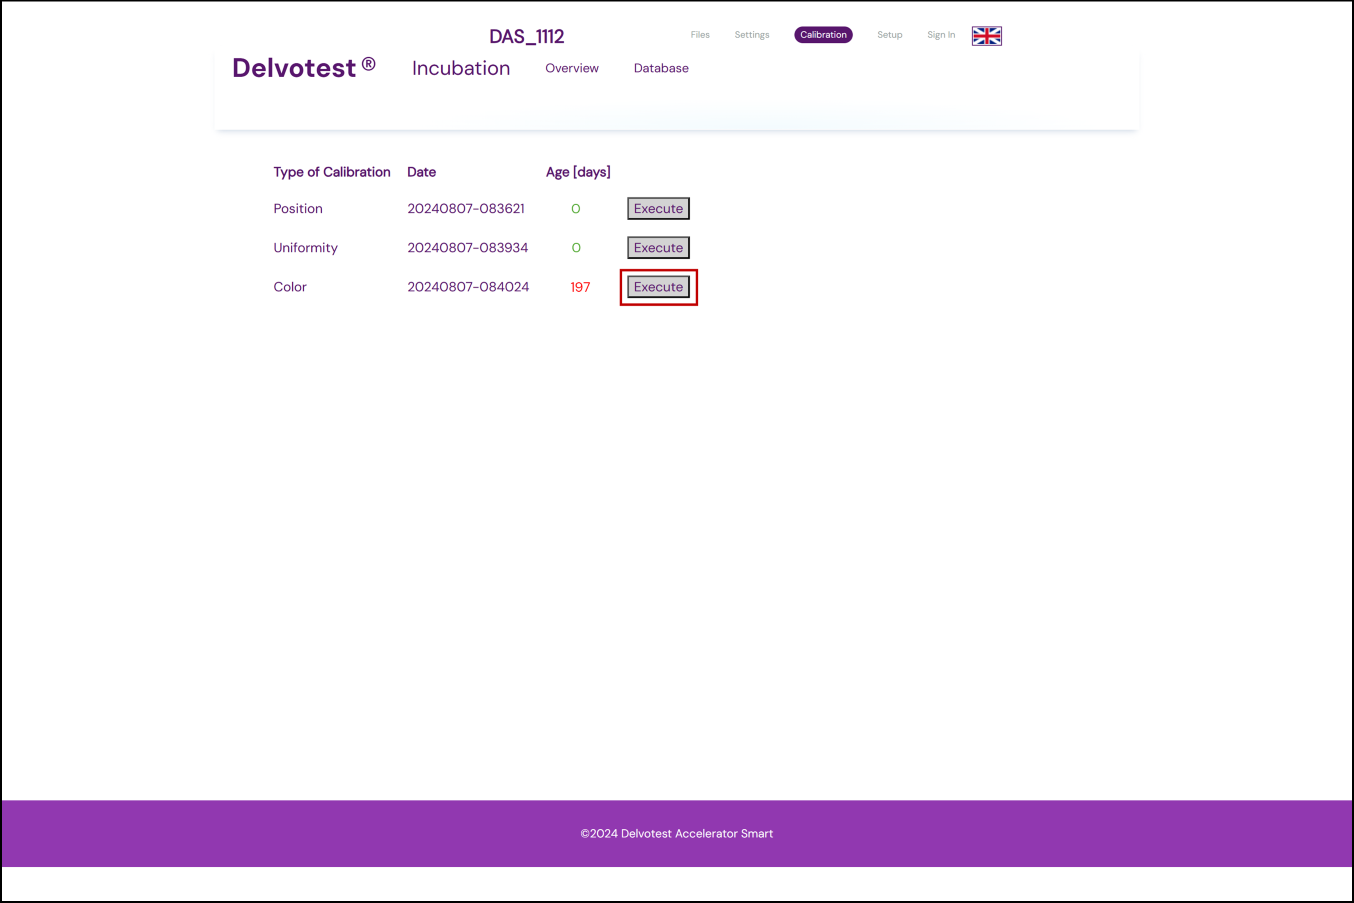
Start by clicking the 'Execute' button in the Color row of the Calibration tab of your DAS's interface. You will need to be signed in as the administrator🔗. The interface will now lead you through instructions of how to do the Uniformity calibration, we will elaborate on those instructions here. If at any point in the process you want to go back, you can press the 'Home' button on the interface to take you back one step in the calibration.
Step 1: Put your DAS into Service Mode:
- Long press (c. 10 seconds) the physical Gear button (⚙️) on your device to put your DAS into 'Service Mode'. Your DAS will need to be in 'Idle' mode to successfully activate 'Service Mode', if it is in 'Energy Saving' or 'Heating' mode, let your DAS heat up until it reaches 'Idle' mode first. When successful, your DAS display will read 'Service Mode' in the status position🔗;
- Once your device is in Service Mode, click the Confirm button to move on to the next step.
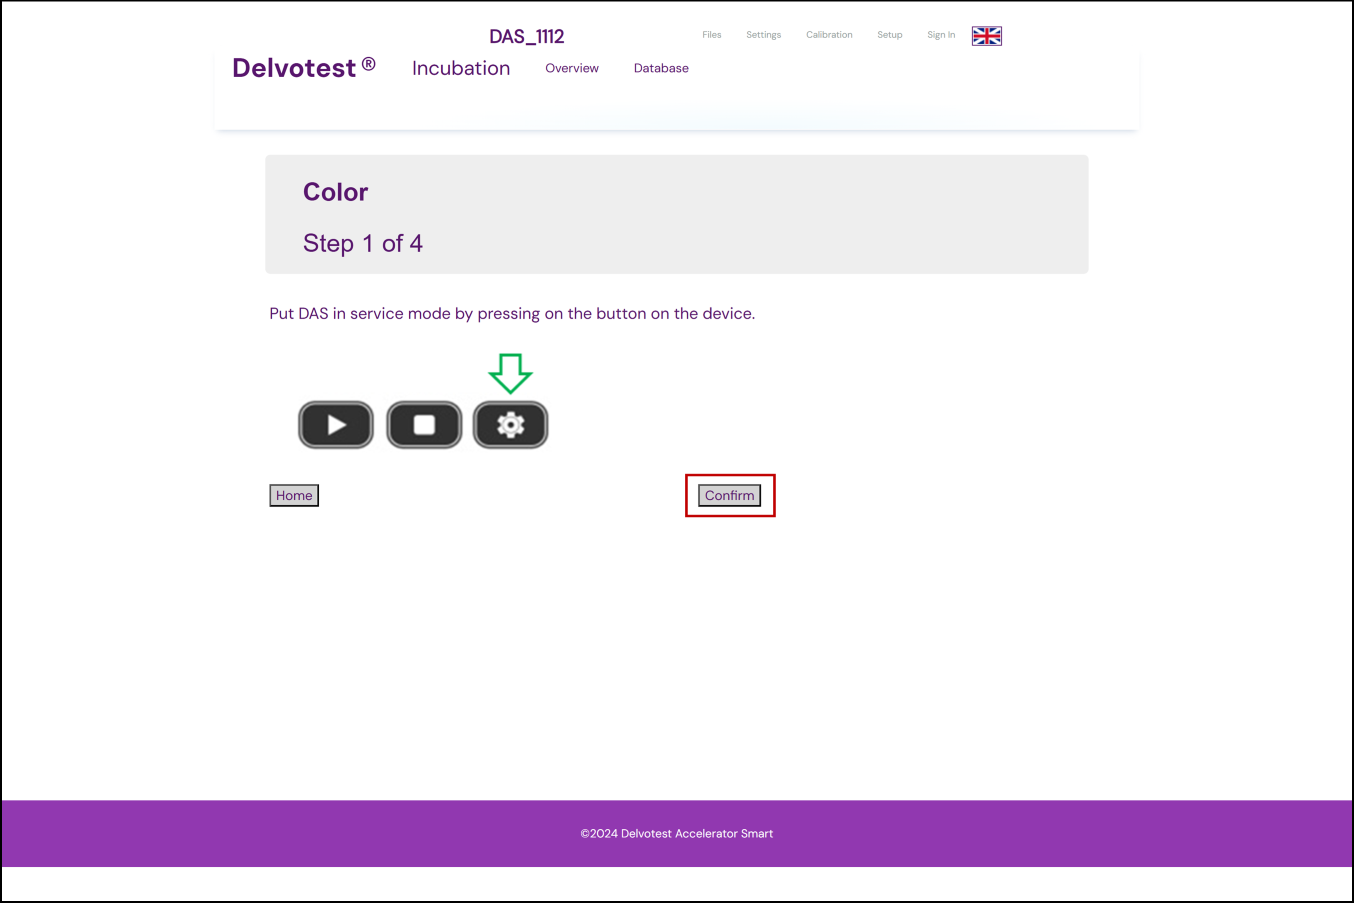
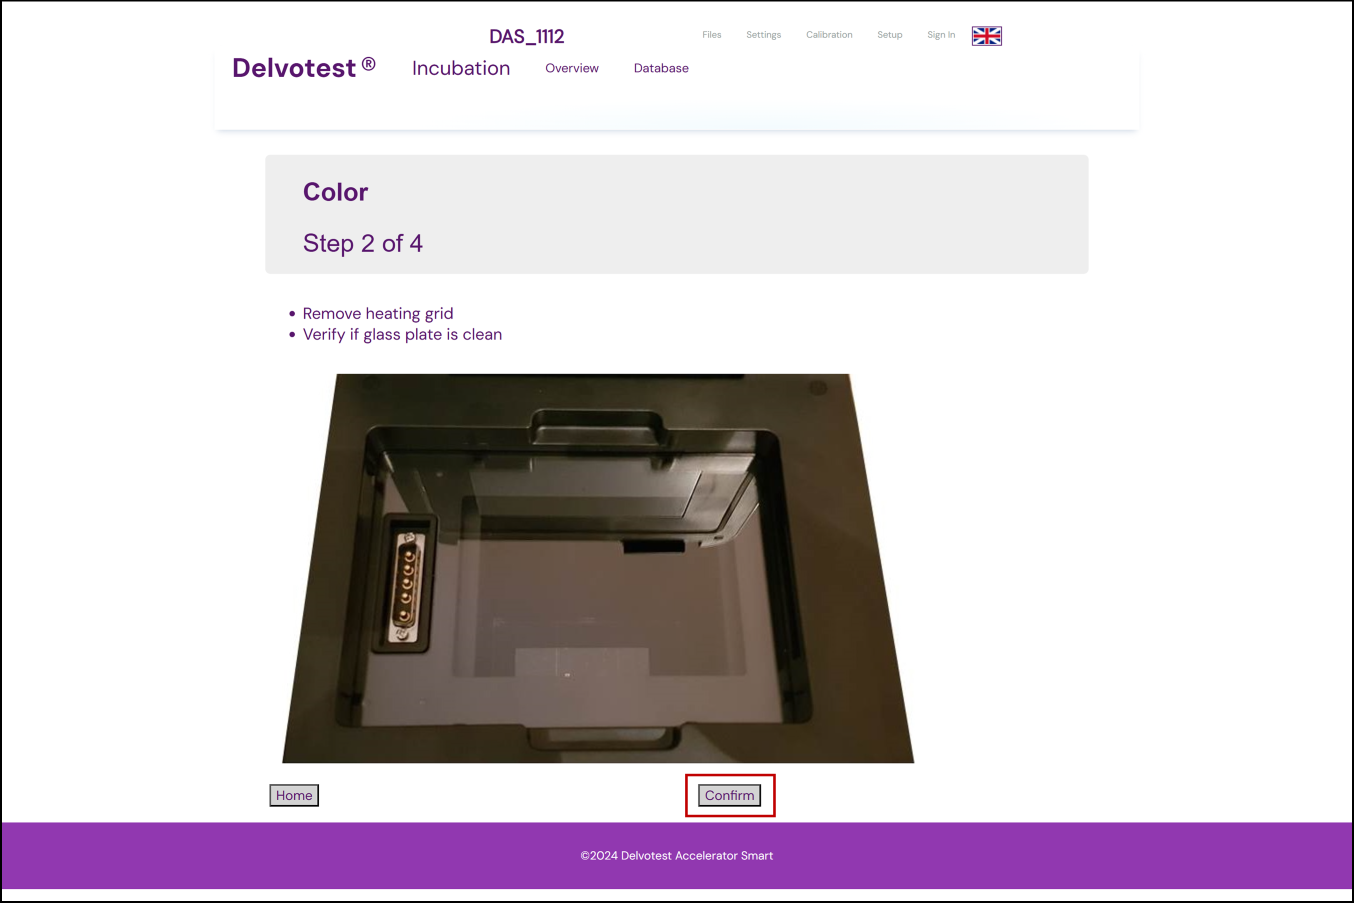
Step 2: Remove heating grid:
- Open the lid and make sure there are no Delvotest® plates in your device;
- Remove the heating grid; [more detail about taking the heating grid out of the device]
- Check the glass underneath the grid is clean, without any smudges, dirt or dust particles.
Need to clean the glass? Then be careful — here are some tips🔗. [correct link?] - Once you're sure the glass is clean, click the Confirm button to move on to the next step.
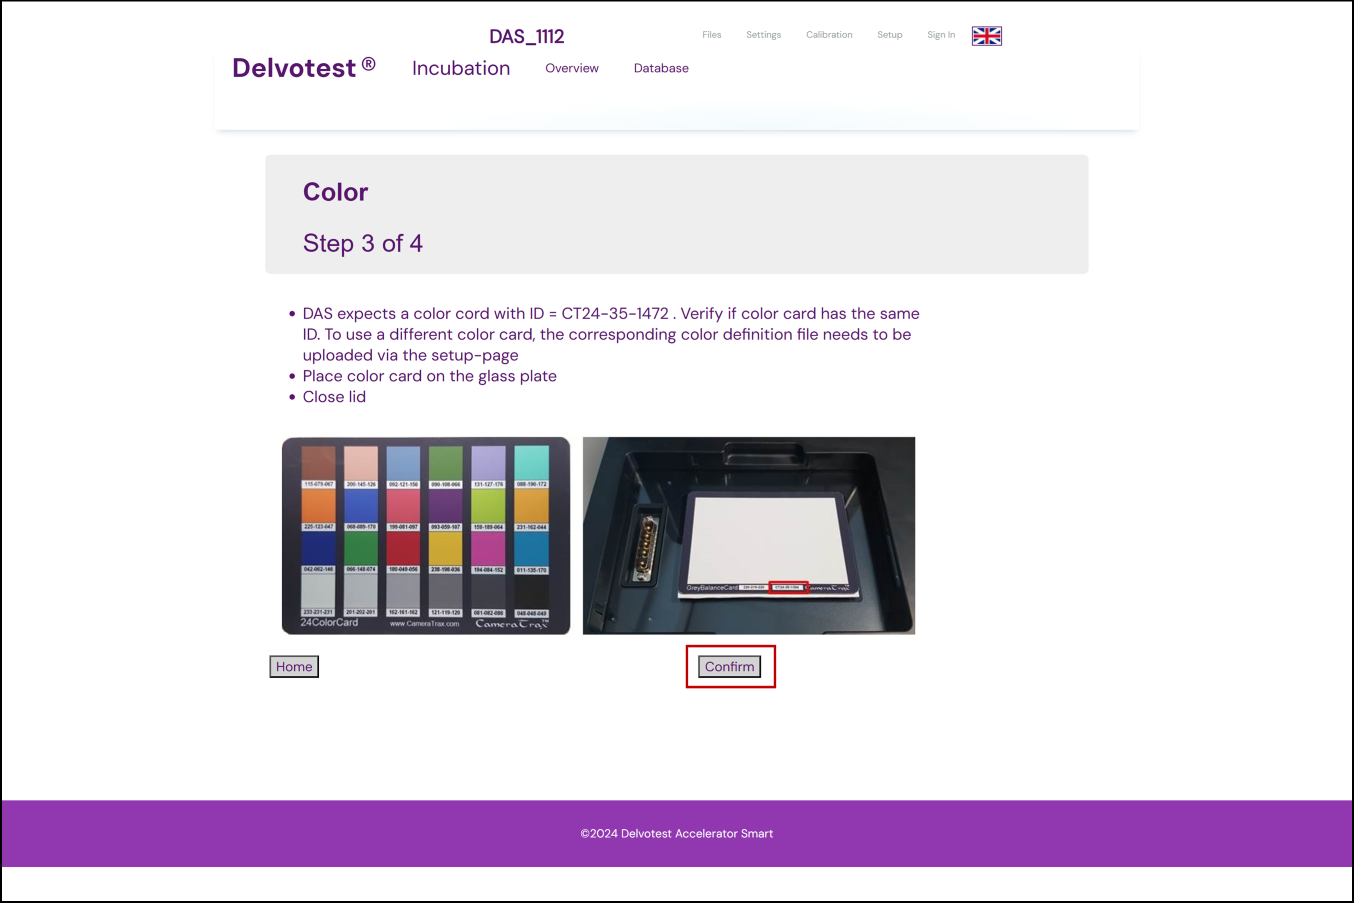
Step 3: Once the next screen has appeared:
- Make sure you have the correct and corresponding physical colour card. If they do not match, refer back to the previous part of the article 'I. Check your Colourcard ID File';
- Place the folded colourcard onto the glass with the 'colour blocks' facing down towards the glass plate, carefully aligning it to the middle of the 'window', to the right of the heating grid locking mechanism, as pictured below.
- Leaving the heating grid out of your DAS, close the lid.
- Click the Confirm button;
- Your device should now start processing and calculating the results, it may show a progress indicator until it has finished. [can't remember why but I don't have a screenshot of this. I think it just happened too quickly and I barely saw it. If you think it's important I can make one using the other screenshots]
Step 4: Colour report:
- You should now see a report on your interface;
- If the calibration has been successful, all results will be within the 'Minimum' ~ 'Maximum' numerical ranges shown in the table, and the Value for the Valid row will read True;
- Now click the Activate button in the lower right hand corner to initiate the calibration results;
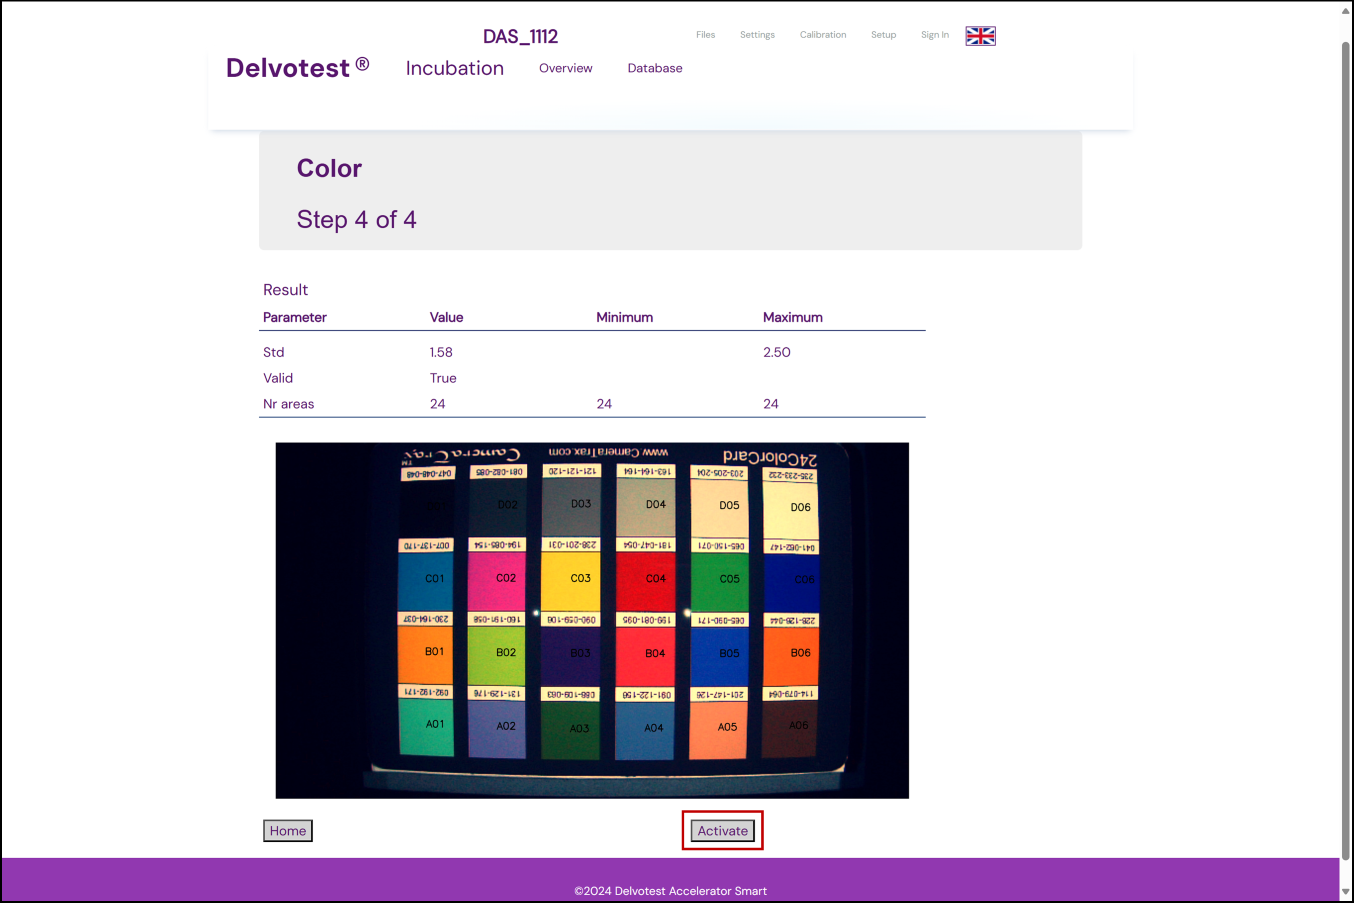
- Once clicked, the button will disappear and in its place text will read "Is Activated";
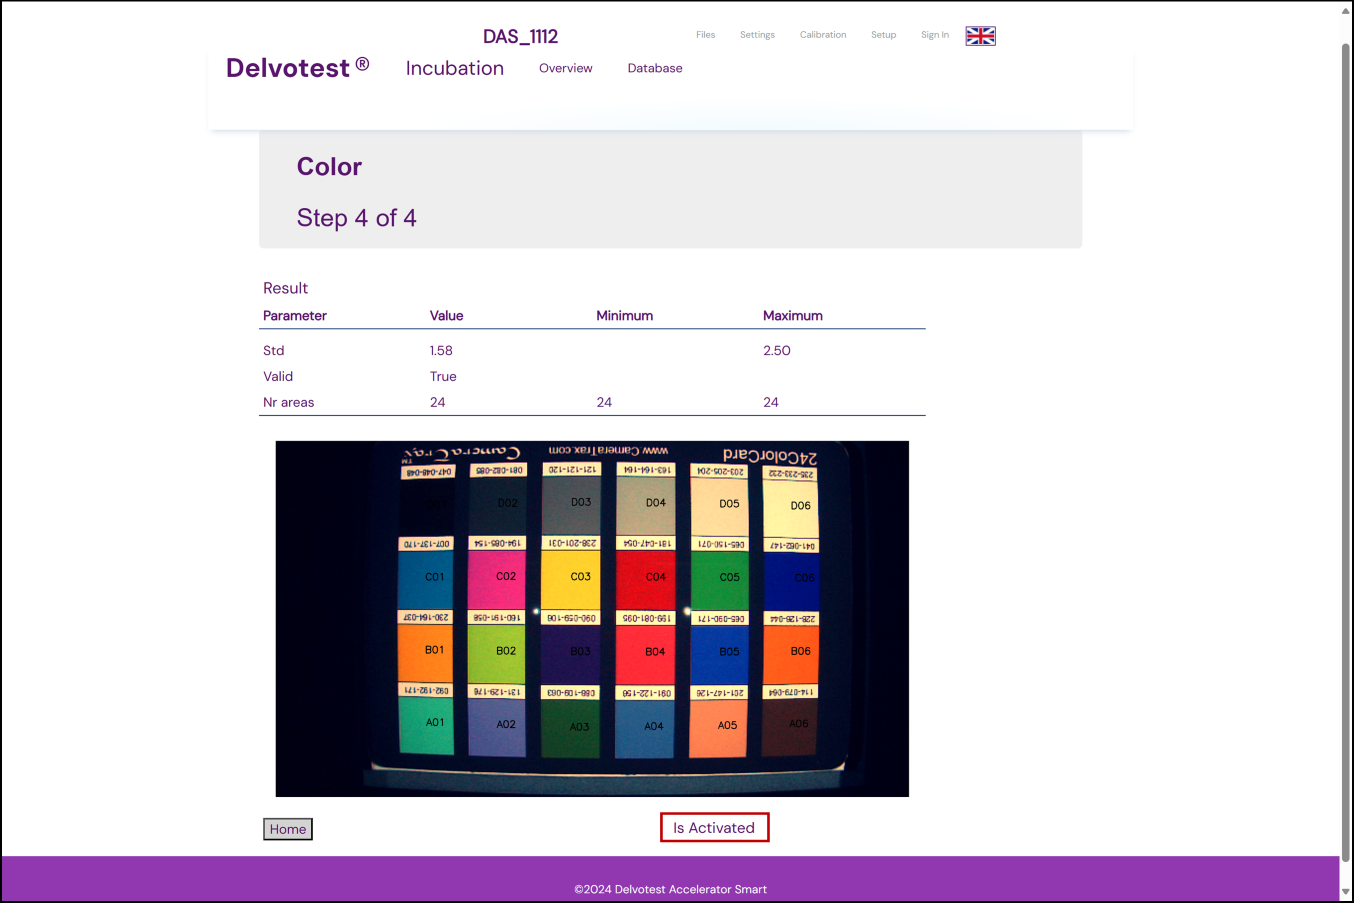
- If the calibration was unsuccessful, the 'Value' for the 'Valid' row will read 'False' and there will not be an 'Activate' button to click. In this case you will need to redo the calibration, for troubleshooting tips see this article🔗 [again, this article is for Uniformity calibrations only, so either that article needs to be edited or a new article needs to be linked here];
- Click the Home button.
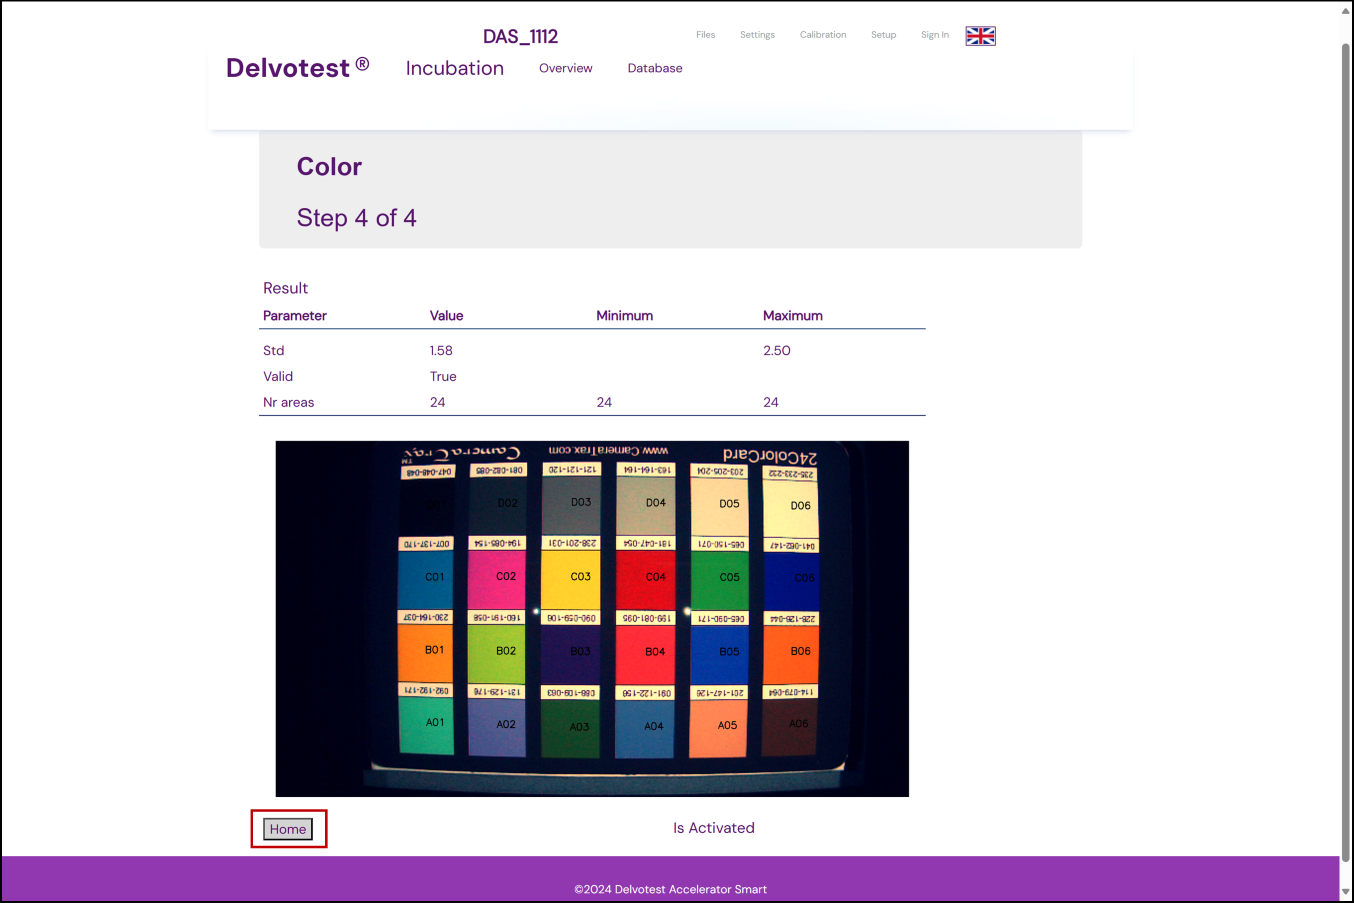
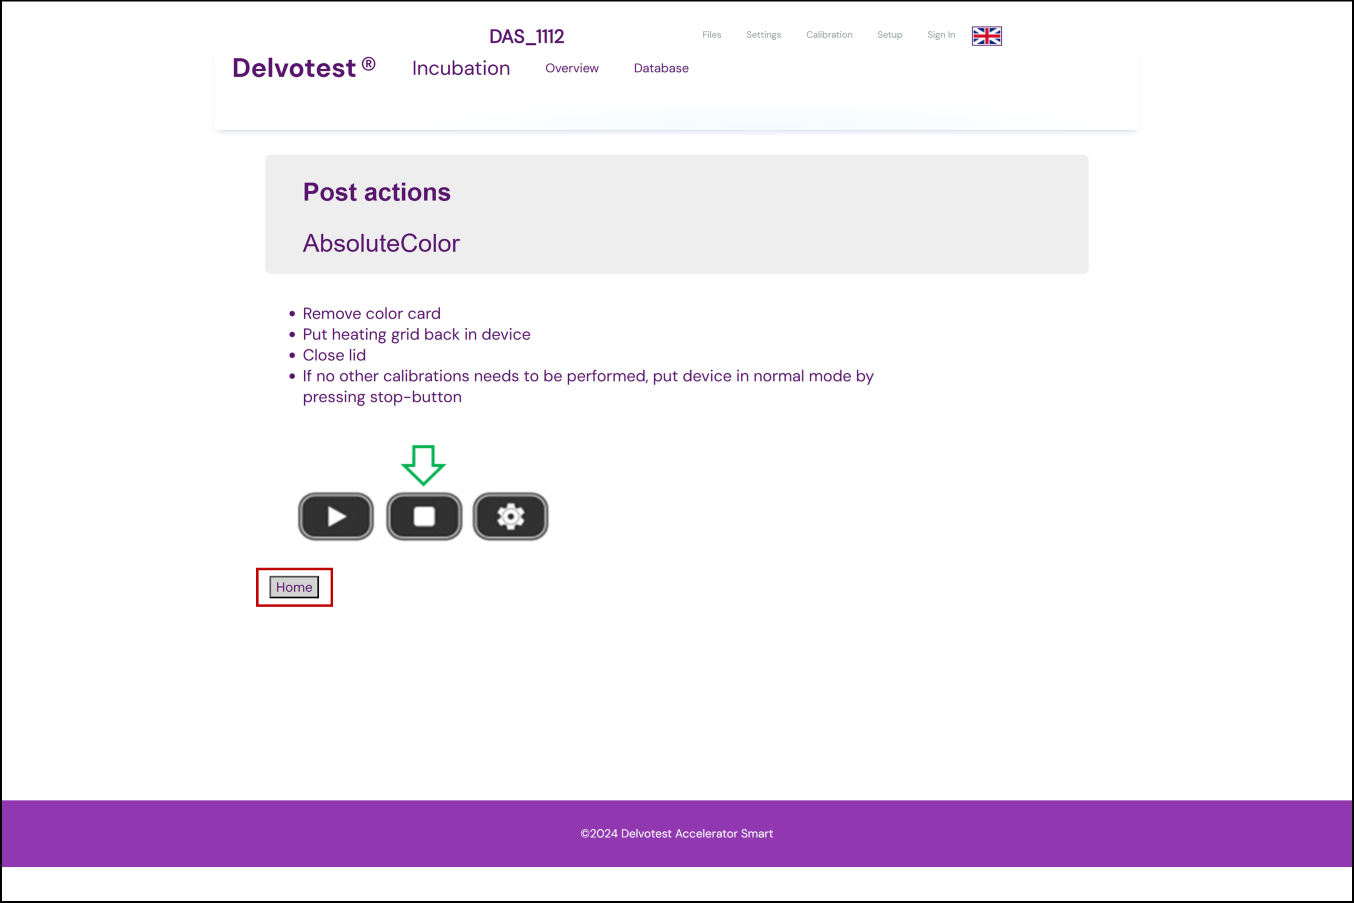
Step 5: Post actions:
- Open the lid;
- Remove the colourcard from on top of the glass;
- Re-insert the heating grid, clicking it back into place;
- Close the lid;
- If you are not doing any other calibrations at this time press the physical stop (⏹️) button on DAS to leave 'Service Mode', make sure your DAS's display no longer reads 'Service Mode' to ensure you have been successful;
- Press the Home button on your interface in your browser;
- This will return you to the Calibration tab home screen, where, if your colour calibration was successful, the 'Age [days]' digit in the 'Position' row should now read '0' in green, indicating 0 days since your last position calibration was successfully done.
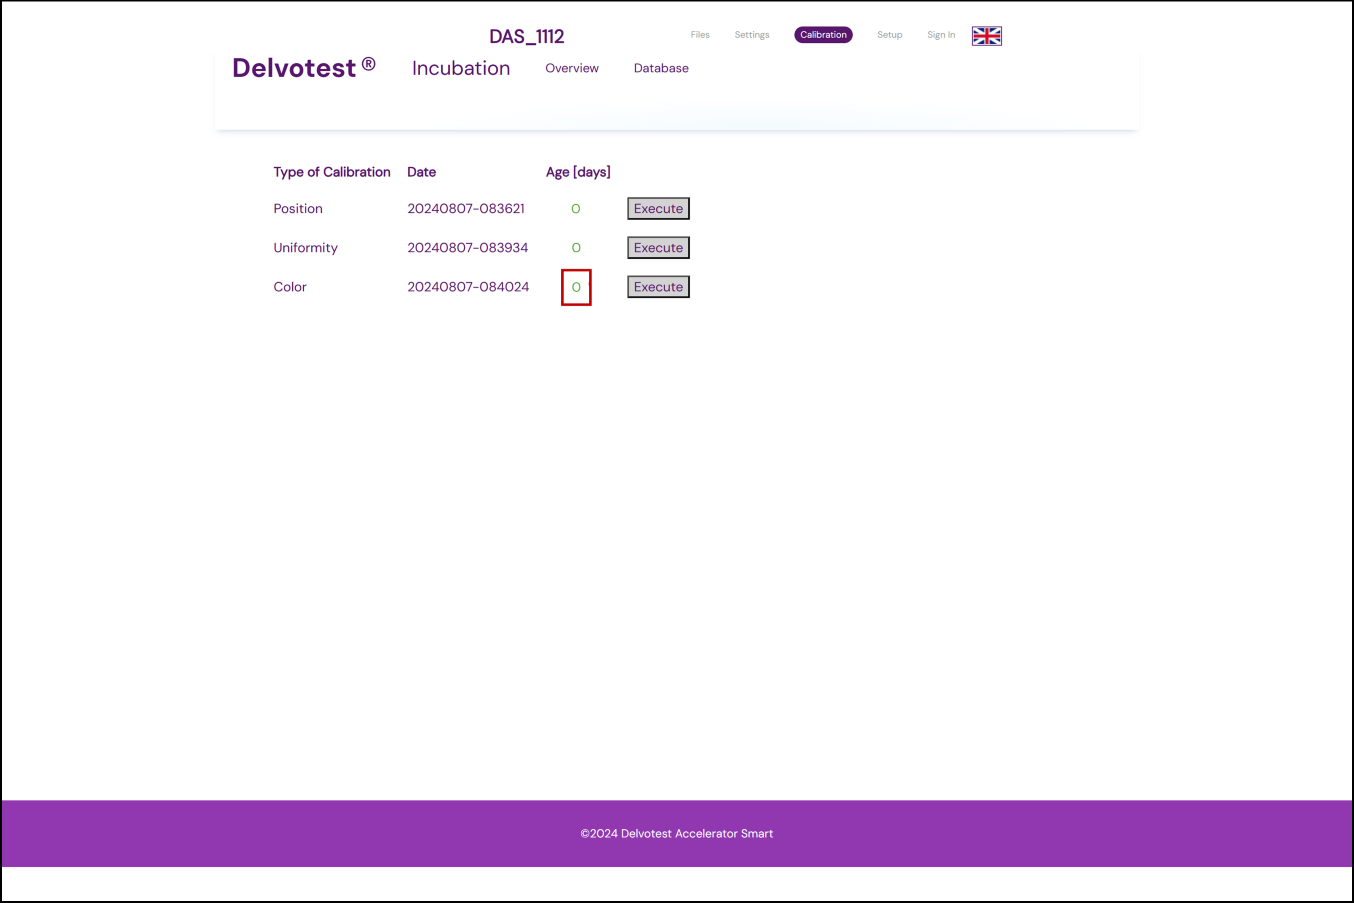
That's three out of three of your DAS calibrations done, congratulations! Now keep on reading — we'll briefly cover how to extract full reports of your calibration results, and some tips on managing future calibrations, before moving on to the next step.
//////////////////////////haven't looked at this bit yet
VI: Extracting Calibration Results
After completing calibrations, your device automatically saves the results in specific folders, helping you easily access and review the data later. Each type of calibration generates detailed reports and raw data that you can extract for further analysis and/or auditing purposes. In this section, we walk you through what types of files are generate from each calibration, and how to access them.
- Access your device's interface via your computer's browser.
- Sign in as the administrator🔗.
- Go to the 'Files' tab.
[[ // show them how to access the directory, show image ]]
Position Data
Once you’ve completed a position calibration, a new folder will be created in your device's 'Calibration' directory, named after the date and time of the calibration. This folder will contain:
- A PDF file titled '[Devicename]_Position-[Date]-[Time].pdf' summarizing the calibration results. This file is also backed up on the network server for easy retrieval.
- 'CalibratedCellPosition.txt' will contain the raw data for the cell positions that were calibrated.
- Your device captures two images during the calibration, along with a final result image that shows the locations of the identified wells on the plate.
These files provide a comprehensive view of how your device detected the well locations on your Delvotest® plates.
Uniformity Data
Once you’ve completed an uniformity calibration, a new folder will be created in your device's 'Calibration' directory, named after the date and time of the calibration. This folder will contain:
- A PDF file titled '[Devicename]_Uniformity-[Date]-[Time].pdf' documenting the results of the uniformity calibration. Like the position calibration, this is also saved on the backup server.
- 'UniformityGain.txt' contains the raw data measuring the uniformity of the lighting distribution.
- Your device captures several images at various exposure times to capture the lighting conditions and ensure uniformity. These images are saved in the folder for further inspection.
The report and raw data can help you verify the evenness of light distribution across your Delvotest® plates.
Colour Data
Once you’ve completed a colour calibration, a new folder will be created in your device's 'Calibration' directory, named after the date and time of the calibration. This folder will contain:
- A PDF file titled '[Devicename]_AbsoluteColor-[Date]-[Time].pdf' summarizing the colour calibration results. This file is also saved on the backup server.
- 'AbsoluteColorCalibration.txt' contains your colour calibration's raw data.
- Your device captures several images (raw and corrected colour images) based on the colourcard during